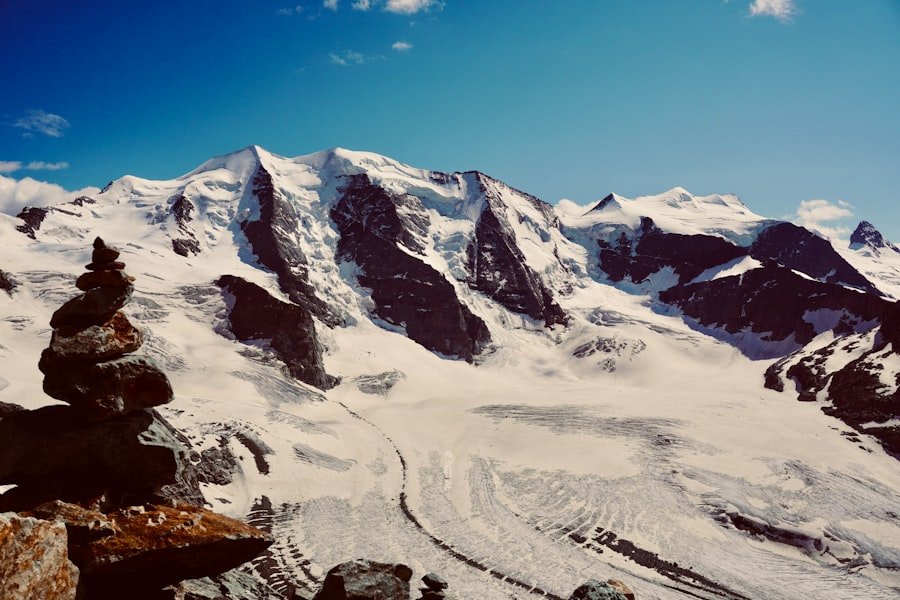
The Aletsch Glacier, a UNESCO World Heritage site, is the largest glacier in the Alps, stretching over 23 kilometers and covering an area of approximately 81 square kilometers. Located in the Bernese Oberland region of Switzerland, it is a breathtaking natural wonder that attracts photographers, hikers, and nature enthusiasts from around the globe. The glacier is not only a stunning visual spectacle but also a vital indicator of climate change, as it has been retreating significantly over the past century.
The viewpoint at Aletsch offers a panoramic vista that showcases the glacier’s immense scale and the surrounding peaks, making it an ideal location for capturing striking photographs. The viewpoint itself is accessible via several hiking trails, with the most popular route starting from the mountain station of the Eggishorn cable car. This vantage point provides an unobstructed view of the glacier as it snakes its way through the mountains, flanked by rugged peaks and lush valleys.
The dramatic contrasts between the icy blue of the glacier and the earthy tones of the surrounding landscape create a visually arresting scene that is ripe for photography.
The interplay of light and shadow on the glacier’s surface, along with the changing weather conditions, can dramatically alter the appearance of the landscape, making each visit a unique experience.
Key Takeaways
- The Aletsch Glacier Viewpoint offers a stunning panoramic view of the largest glacier in the Alps, providing a unique opportunity for capturing its beauty.
- The best time for photography at the Aletsch Glacier is during the golden hours of sunrise and sunset, when the soft light enhances the glacier’s features and creates a warm, inviting atmosphere.
- When selecting equipment for photographing the Aletsch Glacier, consider using a wide-angle lens to capture the expansive landscape and a tripod for stability in low light conditions.
- Finding the perfect composition at the Aletsch Glacier involves experimenting with different angles and perspectives to showcase the glacier’s grandeur and scale.
- Dealing with lighting and exposure challenges at the Aletsch Glacier requires adjusting your camera settings to balance the bright snow and ice with the surrounding landscape.
Choosing the Right Time for Photography
Timing is critical when it comes to photography, especially in a location as dynamic as the Aletsch Glacier viewpoint. The best times to photograph this stunning landscape are typically during the early morning or late afternoon when the sun is low in the sky. During these golden hours, the soft, warm light enhances the textures and colors of the glacier, creating a magical atmosphere that is difficult to replicate at other times of day.
The low angle of sunlight casts long shadows and highlights the intricate details of the ice formations, making for compelling compositions. Moreover, weather conditions play a significant role in determining the best time for photography. Clear skies can provide a striking contrast against the glacier’s icy surface, while dramatic cloud formations can add depth and mood to your images.
It’s essential to monitor local weather forecasts and be prepared for sudden changes in conditions. For instance, a storm rolling in can create a moody atmosphere with swirling clouds and mist that envelops the glacier, offering unique photographic opportunities that differ from those presented on clear days. Being flexible with your schedule and willing to wait for the right moment can yield stunning results.
Selecting the Best Equipment for Capturing the Beauty
When it comes to photographing the Aletsch Glacier, having the right equipment can make a significant difference in capturing its beauty effectively. A DSLR or mirrorless camera with manual settings is ideal for this type of landscape photography, as it allows for greater control over exposure, aperture, and shutter speed. A wide-angle lens is particularly useful for capturing expansive views of the glacier and its surroundings, as it enables you to include more of the landscape in your frame.
Lenses with focal lengths ranging from 16mm to 35mm are often recommended for this purpose. In addition to your camera and lens, consider bringing a sturdy tripod to stabilize your shots, especially in low-light conditions or when using slower shutter speeds. A tripod will help you achieve sharp images and allow for longer exposures if you wish to capture movement in clouds or water.
Filters can also enhance your photographs; a polarizing filter can reduce glare from the ice and enhance colors, while neutral density filters can help manage exposure in bright conditions. Carrying extra batteries and memory cards is essential, as cold temperatures can drain batteries quickly, and you may find yourself taking more photos than anticipated.
Finding the Perfect Composition
| Aspect | Metric |
|---|---|
| Rule of Thirds | Percentage of images following the rule of thirds |
| Balance | Number of images with balanced composition |
| Leading Lines | Percentage of images with leading lines |
| Symmetry | Number of images with symmetrical composition |
Composition is a fundamental aspect of photography that can elevate your images from ordinary to extraordinary. When photographing the Aletsch Glacier, consider employing compositional techniques such as leading lines, rule of thirds, and framing to create visually engaging photographs. Leading lines can be found in natural elements like paths or ridges that draw the viewer’s eye toward the glacier or other focal points in your image.
This technique helps guide attention and creates a sense of depth within your photographs. The rule of thirds is another effective compositional guideline that involves dividing your frame into a grid of nine equal parts and placing key elements along these lines or at their intersections. For instance, positioning the glacier along one of these lines while leaving space for dramatic skies or surrounding mountains can create a balanced and harmonious image.
Additionally, incorporating foreground elements such as rocks or wildflowers can add depth and context to your shots, making them more engaging. Experimenting with different angles and perspectives will also help you discover unique compositions that highlight both the grandeur of the glacier and its intricate details.
Dealing with Lighting and Exposure Challenges
Photographing glaciers presents unique lighting challenges due to their reflective surfaces and varying textures. The bright white ice can easily lead to overexposed highlights if not managed correctly.
Underexposing slightly can help retain detail in bright areas while ensuring that shadows are not lost in darkness. Additionally, using manual mode allows you to have full control over your exposure settings. Start by setting your aperture based on your desired depth of field; a smaller aperture (higher f-stop number) will increase depth of field but may require longer exposure times.
Adjust your ISO settings based on lighting conditions; lower ISO values (100-200) are preferable for bright conditions to minimize noise. In contrast, higher ISO settings may be necessary during twilight or cloudy days but should be used judiciously to avoid grainy images.
Capturing the Details and Textures of the Glacier
While sweeping vistas are captivating, capturing the intricate details and textures of the Aletsch Glacier can provide a different perspective that showcases its unique characteristics. Close-up shots of ice formations, crevasses, and meltwater streams can reveal stunning patterns and colors that are often overlooked in wide-angle compositions. Using a macro lens or a lens with a close focusing distance allows you to explore these details more intimately.
Pay attention to how light interacts with the ice; reflections and refractions can create mesmerizing effects that highlight textures and shapes within the glacier. Experimenting with different angles can yield diverse results; shooting from above or at ground level can dramatically change how textures are perceived in your images. Additionally, capturing details during different times of day can alter their appearance; early morning light may cast soft shadows that enhance textures, while midday sun may create stark contrasts that emphasize sharp edges.
Incorporating the Surrounding Landscape into Your Shots
The Aletsch Glacier does not exist in isolation; it is part of a larger ecosystem that includes majestic mountains, lush valleys, and diverse flora and fauna. Incorporating these elements into your photographs can provide context and enhance storytelling within your images. For instance, including nearby peaks or valleys in your composition can help convey the scale of the glacier while adding layers to your photograph.
Consider using foreground elements such as trees or rocks to frame your shot; this technique not only adds depth but also creates a sense of place that situates the glacier within its environment. Additionally, capturing seasonal changes in surrounding landscapes can provide unique opportunities; wildflowers blooming in spring or autumn foliage contrasting against glacial ice can create vibrant color palettes that enhance your photographs’ visual appeal.
Post-Processing Tips for Enhancing Your Aletsch Glacier Photos
Post-processing is an essential step in digital photography that allows you to refine your images and bring out their full potential. Software like Adobe Lightroom or Photoshop offers powerful tools for adjusting exposure, contrast, saturation, and sharpness. When editing photos taken at Aletsch Glacier, start by correcting any exposure issues; adjusting highlights and shadows can help recover details lost in bright or dark areas.
Color correction is another critical aspect; glaciers often exhibit various shades of blue due to light refraction within ice crystals. Enhancing these colors while maintaining natural tones can make your images more striking without appearing artificial. Additionally, consider applying local adjustments using brushes or gradients to emphasize specific areas within your photograph—such as brightening foreground elements or enhancing textures on the glacier’s surface.
Sharpening your images during post-processing can also enhance details significantly; however, be cautious not to overdo it as this can introduce noise or artifacts into your photos. Finally, consider cropping your images to improve composition further or eliminate distractions from the frame’s edges. By carefully editing your photographs, you can transform them into stunning representations of one of nature’s most awe-inspiring wonders—the Aletsch Glacier.
If you’re planning a visit to the Aletsch Glacier viewpoint, capturing the breathtaking scenery with your camera is a must. To make the most of your photography experience, consider visiting during the golden hours of sunrise or sunset when the light casts a magical glow over the glacier. Use a polarizing filter to reduce glare and enhance the colors of the ice and surrounding landscape. For more tips on capturing stunning natural landscapes, you might find inspiration in this
Written by Hunter James
Hunter James, Age 30 Founder & Lead Editor, TaglineToday.com Hunter James is a product research enthusiast and digital content strategist based in Austin, Texas. With a background in e-commerce and consumer behavior, Hunter has spent the past decade helping everyday shoppers make smarter purchasing decisions through honest, data-backed product reviews. At TaglineToday.com, Hunter combines sharp trend analysis with hands-on testing to deliver trusted recommendations on Amazon gadgets, home essentials, automotive accessories, and the latest lifestyle tools. His mission? To cut through the noise and bring real value to readers by reviewing only what’s worth their time and money. When he’s not comparing specs or writing buyer’s guides, you’ll find him hiking Texas trails, experimenting with tech gear, or refining SEO strategies that help his content reach the right people at the right time. 📬 Got a product suggestion or review request? Reach out via the contact form — Hunter reads every message.