Disclosure: As an Amazon Associate, we earn from qualifying purchases. If you click a link on this page and make a purchase, we may receive a small commission at no extra cost to you.
Cloudy headlights can weaken the beam pattern you see at night and make a well-kept vehicle look neglected. The 3M Headlight Restoration Kit Heavy Duty 2-Pack, model 39008F2, uses drill-powered sanding, refining, and polishing to remove exterior oxidation from plastic lenses. It offers a deeper restoration than a wipe-on cleaner, but you need a household drill, careful masking, and enough time to complete every grit and polishing step. This review helps you decide whether the kit suits your lens condition, tools, and comfort level.
Quick Verdict
Editorial Rating: 8.8/10
Best For: DIY drivers restoring moderate to heavy exterior haze on intact plastic headlights.
Bottom Line: The 3M heavy-duty system gives you an effective progressive-abrasive process and enough material for more than a quick touch-up. The tradeoff is a more demanding application that can produce uneven results if you rush, skip a grit, or let the drill sit in one spot.
Key Takeaways
- The Amazon-linked product is the 3M Heavy Duty Headlight Lens Restoration System 2-Pack, model 39008F2.
- It is made for exterior oxidation, yellowing, light scratches, and haze on clear plastic automotive lenses.
- The drill-powered process uses progressive sanding discs, a 3M Trizact refining disc, rubbing compound, and a polishing pad.
- The two-pack format gives you two restoration kits. Each individual 39008 kit is designed with materials for two headlight lenses.
- It cannot repair cracks, broken mounts, failed seals, internal condensation, damaged reflectors, bulbs, or wiring problems.
| Specification | Detail |
|---|---|
| Brand | 3M |
| Product Name | Heavy Duty Headlight Lens Restoration System, 2-Pack |
| Model / Part Number | 39008F2 |
| Product Type | Drill-powered plastic lens restoration kit |
| Pack Size | Two restoration kits |
| Coverage | Each individual kit includes materials intended for two headlight lenses |
| Disc Sizes | 3-inch sanding and refining discs; 3.25-inch disc pad holder |
| Abrasive Stages per Kit | 500-grit Gold sanding discs, 800-grit white finishing discs, and a 3M Trizact refining disc |
| Finishing Components | Rubbing compound and polishing pad; listing information also references masking tape and protectant |
| Compatible Surfaces | Clear plastic headlights, taillights, fog lights, and directional light lenses |
| Tool Needed | Common household drill and spray bottle with water |
| Listed Package Dimensions | 9 x 12 x 3 inches |
| Listed Package Weight | 0.21 kilograms (about 7.4 ounces) |
| Safety Note | Wear eye protection and a suitable dust mask, protect nearby paint, and follow the included instructions. |
What Is the 3M Headlight Restoration Kit?
The Amazon-linked product is a two-pack of 3M’s model 39008 heavy-duty restoration system. It removes weathered material from the outside of clear plastic lenses instead of hiding oxidation under a temporary cleaner. The process starts with coarser sanding, moves through a finer finishing stage, uses a 3M Trizact disc to refine the surface, and ends with compound and polishing.
This is a corrective kit for lenses with visible yellowing, rough oxidation, or dullness that a simple hand polish cannot remove. It is not a general headlight repair kit. The sanding components work only on the exterior plastic surface, so the housing, bulb, reflector, seals, and electrical system must already be in usable condition.
What Problem Does It Solve?
Sunlight, road grit, weather, and age can break down the outer surface of a plastic headlight lens. The result can be a yellow, cloudy, or rough layer that scatters light and makes the front of your vehicle look older. The 3M system removes that damaged surface in controlled stages, then polishes the lens to restore clarity.
The main benefit is cost control. When the damage is limited to exterior oxidation, restoration may delay or avoid replacing an otherwise sound headlight assembly. Replacement is still the better choice when the lens is cracked, the housing leaks, mounting tabs are broken, or the internal reflector has deteriorated.
Before You Buy: Confirm that the haze is on the outside. Rub a clean, damp cloth over the lens and inspect it from several angles. If moisture or fog sits behind the lens, sanding the exterior will not fix the seal or internal condensation.
Who Should Buy It?
Best For
- Drivers with moderate or heavy exterior oxidation on plastic lenses.
- DIY owners who have a household drill and can keep it moving with even pressure.
- Households restoring more than one vehicle or keeping a second kit for a later job.
Skip If
- Your headlights are glass, cracked, leaking, internally fogged, or damaged around the mounts.
- You want a no-tool wipe-on treatment for very light haze.
- You are not comfortable sanding close to painted panels and trim.
What’s in the 3M Heavy Duty System?
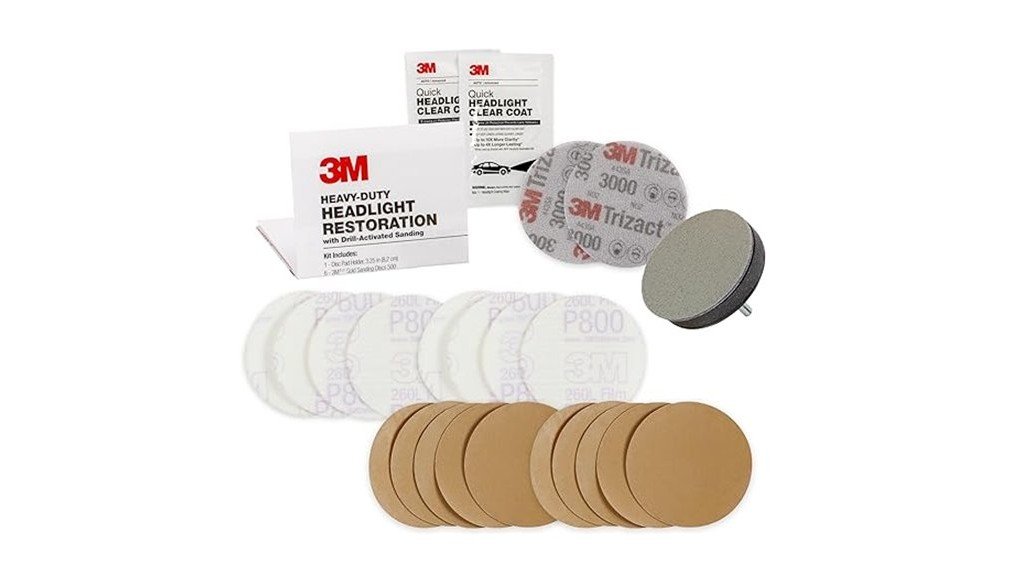
Each model 39008 kit centers on a 3.25-inch drill pad holder and three abrasive stages. The official component list includes six 3-inch 500-grit Gold sanding discs, four 3-inch 800-grit white finishing discs, and one 3-inch 3M Trizact refining disc. It also includes rubbing compound and a polishing pad for the final clarity step.
The linked 39008F2 listing is a two-pack, so you receive two individual restoration kits. Package descriptions also reference masking tape and a protectant. Because packaging and included finishing products can change, compare the current Amazon photos and printed contents list before starting, especially if you plan to use a specific UV coating after polishing.
Abrasives and Build Quality
The kit’s main strength is its staged abrasive system. The 500-grit discs remove the damaged surface, the 800-grit discs reduce the first-stage sanding pattern, and the Trizact disc refines the lens before polishing. Following that order matters because compound alone cannot reliably hide deep sanding marks.
The Hookit-style disc attachment makes grit changes quick, while the small pad size suits common headlight shapes. The rigid drill-backed setup also demands control on curved edges. Keep the pad as flat as the lens allows, avoid sharp body lines, and do not hold the spinning disc in one place.
How to Use the 3M Headlight Restoration Kit
- Wash and inspect the lens. Remove dirt and dry the surrounding bodywork. Stop if you find cracks, loose mounts, or moisture inside the housing.
- Mask the paint and trim. Use multiple overlapping tape layers around the entire lens edge. Add a towel or plastic sheet over nearby panels if your headlight has tight curves.
- Start with the specified coarse disc. Keep the drill moving and use controlled pressure. Sand until the surface has a consistent appearance rather than isolated glossy or yellow patches.
- Clean between grit stages. Wipe or rinse away residue so coarse particles do not contaminate the finer disc.
- Move to the 800-grit stage. Work evenly across the full lens and pay attention to edges that received less sanding in the first pass.
- Use the Trizact refining disc as directed. The wet refining stage should reduce the uniform sanding haze and prepare the surface for compound.
- Compound and polish the lens. Use the included pad and product amount specified in the instructions. Keep the pad moving until the lens becomes evenly clear.
- Apply the included or separately chosen protection. Follow the package directions and allow any coating or protectant to cure before exposing it to water.
Pro Tip: Restore both headlights during the same session and compare them under the same lighting. A uniform finish is easier to judge when both lenses receive the same preparation, grit sequence, and polishing time.
Setup Tips Before First Use
Work in a shaded, dry, well-ventilated area. Have a spray bottle, clean microfiber towels, extra automotive masking tape, eye protection, a suitable mask, and access to water before you begin. A corded drill avoids battery interruptions, but a charged cordless drill can be easier to control around the vehicle.
Read the included instructions before attaching a disc. Arrange the abrasives in order and keep used coarse discs separate from the refining and polishing components. This simple setup reduces the chance of using the wrong disc or carrying coarse residue into a finer step.
Compatibility and Safety
The system is intended for clear plastic automotive lenses, including headlights, taillights, fog lights, and directional lights. Do not use it on glass, painted surfaces, chrome trim, camera lenses, instrument covers, or soft interior plastics unless 3M specifically approves that surface in the instructions.
Sanding creates plastic dust and compound residue. Wear eye protection and a suitable dust mask, secure loose clothing and hair, and keep children and pets away from the work area. Protect nearby paint with more than a narrow tape line, especially when using a drill near pointed corners or raised bodywork.
Restoration may improve light transmission through an oxidized outer lens, but it does not correct a weak bulb, poor headlight aim, damaged wiring, a failing ballast, or a deteriorated internal reflector. Inspect the complete lighting system if visibility remains poor after the lens is clear.
How It Performs in Real Use
For Heavy Exterior Oxidation
The drill-powered 500-grit and 800-grit stages give this kit more cutting ability than a cleaner or hand-polish-only product. That makes it useful for yellow, rough lenses, but it also removes more material. Use it as a corrective restoration rather than a frequent maintenance treatment.
For Night Driving
Removing exterior haze can help more of the existing beam pass through the lens. The benefit depends on the rest of the headlight system, so check bulb condition and aim after restoration instead of assuming the lens was the only cause of weak lighting.
For Older Vehicles and Resale Preparation
Clearer lenses can make the front of an older vehicle look cleaner without replacing complete assemblies. The result is most convincing when both headlights are restored evenly and the surrounding trim is cleaned after the compound work.
For Multiple Vehicles or Future Maintenance
The 39008F2 package contains two individual kits. That format makes sense when you have two vehicles, unusually large lenses, or want unused supplies for a later restoration. Store the second kit sealed, dry, and away from heat so the compound and attachment materials remain usable.
What Buyers Commonly Like and Dislike
Positive feedback usually focuses on the visible change after completing every sanding and polishing stage. The kit is especially appealing to buyers who prefer a full abrasive process over a temporary surface cleaner.
The common complaints are also practical. The job creates dust, takes patience, and can leave visible sanding marks when a stage is rushed. Some buyers also prefer to add a separate UV-resistant headlight coating after polishing, so check the exact contents and decide on protection before you start.
Pros and Cons
Pros
- Progressive 500-grit, 800-grit, Trizact, and polishing stages address substantial exterior oxidation.
- Drill-powered pad reduces the hand effort required for a full corrective restoration.
- Each individual kit includes materials intended for two headlight lenses.
- The two-pack format suits multiple vehicles or a later restoration job.
- Costs less than replacing many structurally sound headlight assemblies.
Cons
- Requires a drill, careful masking, water, cleanup, and close control around curved lens edges.
- Skipping or shortening a grit stage can leave scratches or uneven clarity.
- Does not solve internal moisture, structural damage, bulb problems, or failed headlight components.
How It Compares to Alternatives
The 3M system is the stronger fit when you need drill-powered cutting for moderate or heavy oxidation. A manual kit such as the Cerakote Ceramic Headlight Restoration Kit may suit you better when you want to avoid a drill. Mothers NuLens offers both polishing and more aggressive sanding options, while Meguiar’s Two Step kit uses a simpler preparation and coating process.
The main buying difference is effort versus cutting ability. Choose 3M when the lens needs a full progressive sanding process and you are comfortable controlling a drill. Choose a lighter manual system for mild haze, easier handling, or routine follow-up care.
Is It Worth the Price?
The 3M Heavy Duty 2-Pack offers strong value when you have multiple oxidized plastic lenses or expect to restore more than one vehicle. You receive two complete abrasive systems rather than a single-use cleaner, and the staged process can address damage that light polish may leave behind.
It is less compelling for one mildly hazy headlight or for buyers without a drill. In those cases, a manual kit or professional service may provide a better balance of convenience, risk, and cost.
Maintenance After Restoration
Wash restored lenses with normal car-wash soap and a soft mitt. Avoid aggressive household cleaners or abrasive pads that can scratch the newly finished surface. Inspect the lenses during routine washing so you can address early dullness before heavy oxidation returns.
Protection matters because sanding removes the weathered outer layer. Use the finishing product supplied with your package as directed, or choose a compatible automotive headlight protectant when the package does not include the protection you want. Follow its cure time and reapplication directions rather than restoring on a fixed six-month schedule.
Common Mistakes to Avoid
- Using too little masking: A narrow tape line may not protect paint if the drill pad slips.
- Moving to the next grit too early: Each stage should leave a consistent surface before you continue.
- Contaminating finer discs: Clean the lens and your hands between sanding stages.
- Holding the drill still: Keep the pad moving to reduce heat and uneven cutting.
- Skipping the finish protection: Confirm what your package includes and protect the polished lens as directed.
- Trying to fix internal damage: Replace or professionally repair housings with leaks, cracks, broken mounts, or internal deterioration.
Frequently Asked Questions
What model is included in the Amazon-linked two-pack?
The linked product is model 39008F2, a two-pack of the 3M 39008 heavy-duty headlight lens restoration system. Check the current listing title and package photos before ordering because sellers can update bundle presentation.
How many headlights can the two-pack restore?
3M states that each individual 39008 kit includes materials for two headlight lenses. The two-pack can therefore cover two normal pairs under typical conditions, although very large or severely oxidized lenses may use more discs or compound.
Do I need a drill?
Yes. This heavy-duty version uses a drill-powered disc pad holder for sanding, refining, and polishing. A manual kit is a better choice when you do not have a drill or do not want to use one near painted panels.
How long does the process take?
3M describes the process as taking as little as about one hour. Your actual time depends on lens size, oxidation, masking, cleaning between stages, and how evenly the first sanding pass removes the damaged layer.
Will it fix fogging inside the headlight?
No. The abrasive process works on the exterior plastic surface. Internal fogging usually points to moisture intrusion, a seal problem, or housing damage that needs separate diagnosis and repair.
Can I use it on glass headlights?
No. The kit is designed for clear plastic automotive lenses. Do not sand glass, paint, chrome, cameras, or other surfaces unless the product instructions specifically approve them.
Does the kit include UV protection?
Current product descriptions reference a protectant, but package details and finishing components can vary. Check the exact contents shown on the Amazon listing and package, then use a compatible headlight protectant if the included finish does not provide the protection you want.
Who should use a professional service instead?
Choose professional help when you are uncomfortable controlling a drill, the lens has deep damage, or the housing has cracks, leaks, broken mounts, or internal deterioration. A technician can also check bulb output, wiring, aim, and the complete assembly when poor visibility remains after cleaning.
The Bottom Line
The 3M Headlight Restoration Kit Heavy Duty 2-Pack is a strong choice for DIY owners who need more correction than a wipe-on cleaner can provide. Its progressive abrasive system is the main strength, while the required drill control, masking, and full grit sequence are the main limitations. Buy it for intact plastic lenses with exterior oxidation, and skip it when the damage is internal, structural, or electrical.
Ready to Buy?
Check the latest price, package contents, and product details before you decide.