

When embarking on the journey of growing potatoes, the first and perhaps most crucial step is selecting the right potato varieties. Potatoes come in a multitude of types, each with its unique flavor, texture, and culinary uses. The primary categories include waxy, starchy, and all-purpose potatoes.
Waxy potatoes, such as Red Bliss and Fingerlings, are known for their smooth texture and hold their shape well when cooked, making them ideal for salads and roasting. Starchy varieties like Russets and Idaho potatoes are perfect for baking and frying due to their fluffy interiors. All-purpose potatoes, such as Yukon Gold, offer versatility in the kitchen, suitable for mashing, boiling, or frying.
In addition to culinary characteristics, climate and growing conditions play a significant role in variety selection. Some potato varieties thrive in cooler climates, while others are more suited to warmer regions. For instance, early-season varieties like ‘New Potatoes’ can be harvested in as little as 60 days, making them ideal for short growing seasons.
Conversely, late-season varieties require a longer growing period but often yield larger tubers. Understanding your local climate and the specific growing conditions of your garden will help you choose the best potato varieties that will flourish in your environment.
Key Takeaways
- Choose potato varieties suited to your climate and growing conditions
- Use containers with good drainage and nutrient-rich soil for optimal growth
- Cut seed potatoes into pieces with at least 2 eyes and let them dry before planting
- Plant seed potatoes in containers with at least 12 inches of soil and keep them well-watered
- Monitor for pests and diseases, and harvest potatoes when the plants start to die back
Selecting the Right Containers and Soil
Once you have chosen the appropriate potato varieties, the next step is to select suitable containers and soil for planting. Potatoes can be grown in various containers, including traditional pots, grow bags, or even repurposed items like old tires or wooden crates. The key is to ensure that the containers have adequate drainage to prevent waterlogging, which can lead to rot.
A container with a depth of at least 12 inches is recommended to allow enough room for the tubers to develop properly. The choice of soil is equally important in ensuring a successful potato crop. Potatoes prefer loose, well-draining soil rich in organic matter.
A mix of potting soil and compost can provide the necessary nutrients while maintaining good drainage. It is advisable to avoid heavy clay soils that can compact around the tubers, restricting their growth. Additionally, incorporating some sand or perlite into the soil mix can enhance aeration and drainage.
Testing the soil pH is also beneficial; potatoes thrive in slightly acidic conditions with a pH range of 5.5 to 6.5. Adjusting the soil pH with amendments like sulfur or lime can create an optimal environment for healthy potato growth.
Preparing the Seed Potatoes for Planting
Preparing seed potatoes for planting is a critical step that can significantly influence your harvest’s success. Seed potatoes are small tubers specifically designated for planting rather than consumption. Before planting, it is essential to “chit” or sprout the seed potatoes.
This process involves placing the seed potatoes in a cool, light location for several weeks until they develop small shoots or “eyes.” Chitting encourages earlier growth and can lead to a more robust crop. Once the seed potatoes have sprouted, it is time to prepare them for planting. If the seed potatoes are larger than a golf ball, they can be cut into smaller pieces, ensuring that each piece has at least one eye.
Allowing these cut pieces to dry for a day or two before planting helps form a protective callus over the cut surface, reducing the risk of rot once they are in the soil. It is also advisable to inspect the seed potatoes for any signs of disease or damage; using healthy seed stock is paramount for a successful harvest.
Planting the Seed Potatoes in Pots
| Week | Number of Seed Potatoes Planted | Average Pot Size (inches) | Soil Moisture Level |
|---|---|---|---|
| 1 | 10 | 12 | Medium |
| 2 | 12 | 10 | High |
| 3 | 15 | 14 | Low |
With your seed potatoes prepared, you can now proceed to plant them in pots. Begin by filling your chosen container with about 4-6 inches of your prepared soil mix. Place the seed potatoes on top of this layer with the eyes facing upwards.
After positioning the seed potatoes, cover them with an additional 4-6 inches of soil, ensuring they are well buried but not too deep. Watering is an essential part of this process; after planting, give the containers a thorough watering to settle the soil around the seed potatoes.
It is crucial not to overwater at this stage; maintaining consistent moisture without waterlogging is key to preventing rot and promoting healthy growth. As the plants begin to emerge from the soil, you may need to add more soil around the stems—a process known as “hilling.” This practice encourages tuber development and helps protect them from sunlight exposure, which can cause greening and bitterness.
Caring for the Growing Potatoes
Caring for growing potatoes involves several important practices that ensure healthy plants and a bountiful harvest. Regular watering is vital during the growing season; potatoes require consistent moisture, especially during flowering when tuber formation occurs. A general rule of thumb is to provide about an inch of water per week, either through rainfall or supplemental irrigation.
However, it’s essential to monitor soil moisture levels closely; overwatering can lead to diseases such as blight or rot. Fertilization also plays a significant role in potato care. While potatoes do not require excessive fertilization, providing them with balanced nutrients can enhance growth and yield.
A slow-release fertilizer high in potassium and phosphorus is beneficial during planting and again when plants are about 6 inches tall. Additionally, regular weeding is necessary to reduce competition for nutrients and water; however, care should be taken not to disturb the shallow roots of the potato plants while weeding.
Managing Pests and Diseases
As with any crop, managing pests and diseases is crucial for successful potato cultivation. Common pests that affect potatoes include aphids, Colorado potato beetles, and wireworms. Regularly inspecting your plants for signs of pest activity can help catch infestations early.
Handpicking pests like Colorado potato beetles can be effective in small gardens; for larger infestations, organic insecticides may be necessary. Diseases such as late blight and early blight can devastate potato crops if not managed properly. Late blight is particularly notorious; it thrives in humid conditions and can spread rapidly through spores carried by wind or water.
To mitigate this risk, practice crop rotation by not planting potatoes in the same location year after year and ensuring good air circulation around plants by spacing them adequately. Applying fungicides at the first sign of disease can also help control outbreaks.
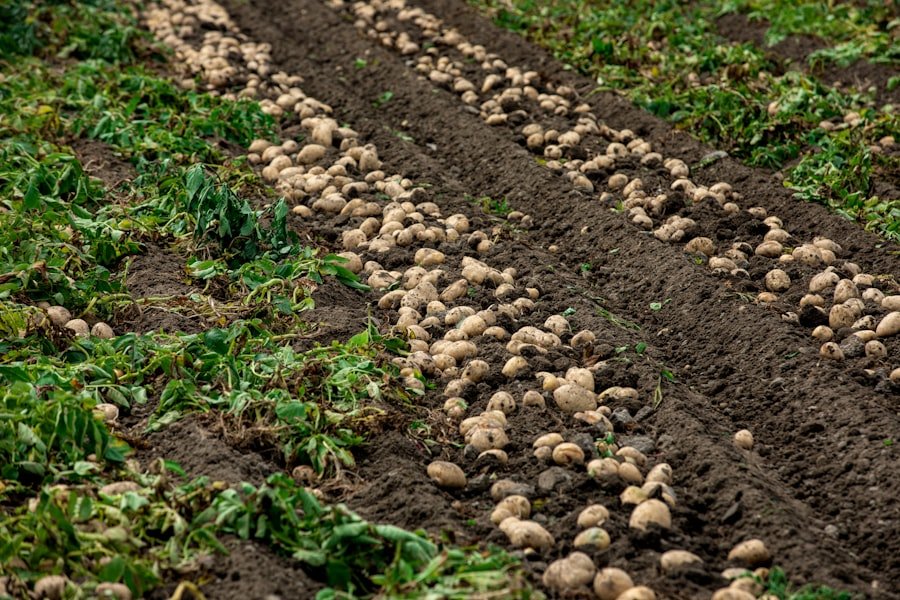
Harvesting the Potatoes
Harvesting potatoes is an exciting time for any gardener, marking the culmination of months of care and effort. The timing of your harvest depends on the variety planted; early-season varieties can be harvested as soon as they flower, while late-season varieties should be left in the ground until their foliage has died back completely. This dieback indicates that the tubers have reached their full size and are ready for harvest.
To harvest potatoes grown in containers, gently tip over the pot or carefully remove it from its position to avoid damaging the tubers. Using your hands or a small garden fork, sift through the soil to collect the potatoes without bruising them. It’s essential to handle them delicately since bruised tubers are more susceptible to rot during storage.
After harvesting, allow the potatoes to dry on a clean surface for a few hours before storing them away from direct sunlight.
Storing and Using the Harvested Potatoes
Proper storage of harvested potatoes is vital to prolong their shelf life and maintain quality.
Avoid storing them in plastic bags; instead, use burlap sacks or cardboard boxes that allow air circulation while protecting them from light exposure.
When it comes to using your harvested potatoes, their versatility in cooking cannot be overstated. From creamy mashed potatoes to crispy fries or hearty potato salads, there are countless ways to enjoy this beloved vegetable. Additionally, incorporating freshly harvested potatoes into seasonal dishes enhances flavor profiles and adds nutritional value to meals.
Whether you choose to bake them with herbs and olive oil or create comforting soups and stews, homegrown potatoes offer a delightful taste of satisfaction that store-bought varieties simply cannot match.
FAQs
What are seed potatoes?
Seed potatoes are small potatoes that are specifically grown and harvested to be used for planting and growing new potato plants.
Can seed potatoes be grown in pots?
Yes, seed potatoes can be successfully grown in pots or containers. This method is especially useful for gardeners with limited space or poor soil conditions.
What type of pots should be used for growing seed potatoes?
It is best to use large, sturdy pots or containers with good drainage. Pots that are at least 16 inches deep and 16 inches in diameter are recommended to allow for proper root development.
How should seed potatoes be planted in pots?
To plant seed potatoes in pots, start by filling the bottom of the pot with a few inches of soil. Place the seed potatoes on top of the soil, spacing them evenly, and then cover them with a few more inches of soil. As the plants grow, continue to add more soil to the pot to cover the emerging stems.
What are the ideal growing conditions for seed potatoes in pots?
Seed potatoes thrive in well-draining, loose soil with plenty of sunlight. They also require regular watering and should be kept consistently moist but not waterlogged.
When and how should seed potatoes be harvested from pots?
Seed potatoes can be harvested from pots once the plants have flowered and the foliage begins to yellow and die back. Carefully dig through the soil to harvest the potatoes, being careful not to damage them. Allow the harvested potatoes to cure in a cool, dark place for a few days before storing or consuming.
