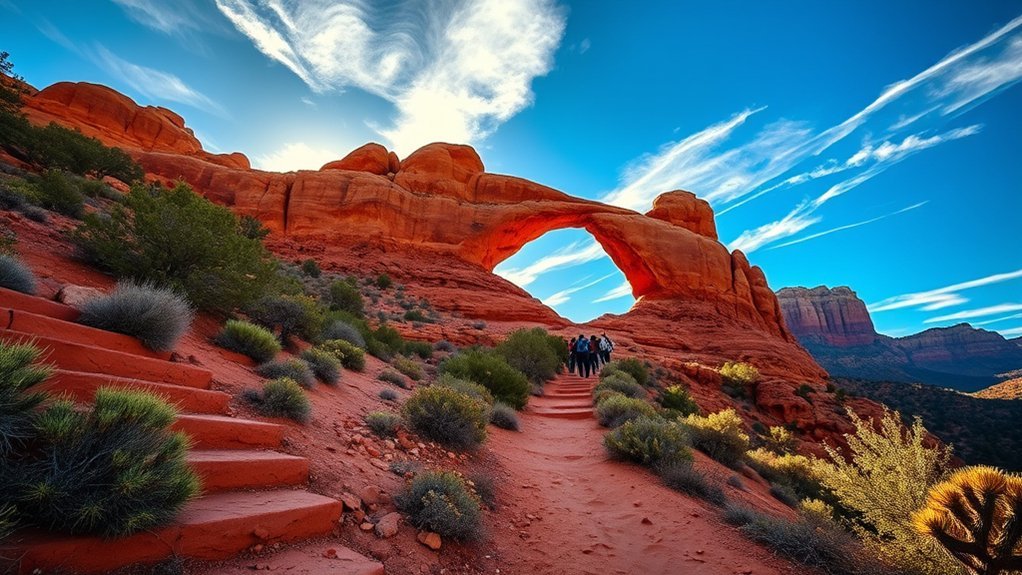
Don’t worry about crowds stopping you — with the right timing and a simple plan you’ll still get your moment on the arch. You can reach Devils Bridge from Dry Creek Road, park early or use the shuttle, and tackle a moderate 4–4.5 mile loop with exposed sections that need steady footing. Bring water, sun protection, and a camera; keep going for practical tips on timing, safety, and the best photo spots so you make the most of your visit.
Best Times to Hike Devils Bridge Trail
The best times to hike Devils Bridge Trail are spring and fall, when daytime temperatures sit comfortably between the 60s and 80s and the trail is less crowded than summer; aim for early morning or late afternoon to catch cooler air, softer light for photos, and smaller groups on the narrow approach to the bridge. You’ll find those best seasons let you move freely, shed city constraints, and enjoy the red-rock panorama with fewer people. Check weather considerations before you go: desert storms can come fast, and winter nights freeze surfaces while summer brings intense heat. Pack layers, sun protection, and plenty of water. Plan to leave early or return before sunset so you control your pace and stay safe.
Getting There: Directions and Parking Options
When you head to Devils Bridge Trail, plan your arrival around the trailhead off Dry Creek Road—it’s the main access point and where most parking options are clustered—because parking is limited and fills quickly on peak days. You’ll want a clear plan so you can move freely and claim your slice of Sedona’s red-rock freedom. If you’re staying in local accommodations, ask the front desk about shuttles or valet spots. Public transport is sparse, so consider rideshares or guided shuttles.
- Park at the Dry Creek Road lot early — spaces vanish by mid-morning.
- Use a shuttle from nearby parking or town to avoid circling.
- If you drive a high-clearance vehicle, consider dispersed parking on the Forest Service road.
Trail Overview: Distance, Difficulty, and Route
The trail to Devil’s Bridge is a moderate out-and-back route of about 4 to 4.5 miles round-trip with roughly 400–500 feet of elevation gain, so plan for steady uphill sections and short rocky scrambles. You’ll follow a well-marked path that shifts from packed dirt and slickrock to narrow ledges as you approach the arch. Keep an eye on footing where the terrain steepens and be ready for exposed sections with no railing.
Distance and Elevation
About 1.5 miles round-trip from the parking area, the Devils Bridge Trail is a short but steep out-and-back that climbs roughly 400 feet to reach the natural sandstone arch; you’ll gain most of that elevation on a series of switchbacks and a final scramble over slick rock. You’ll want hiking essentials and an eye on trail amenities before you push upward — water, sturdy shoes, sun protection, and a sense of purpose.
- Terrain gain: ~400 ft over a compact distance, expect sustained effort.
- Pace: plan 1–2 hours round-trip depending on stops and your comfort with scrambling.
- Exposure: final approach is open; wind and sun intensify effort, so move deliberately and claim the view.
Route and Terrain
Stepping onto the Devils Bridge Trail, you’ll encounter a compact route that packs steep switchbacks, exposed slickrock, and a short scramble into roughly 0.75 miles one-way; expect sustained effort and a need for steady footing rather than long mileage. You’ll navigate red sandstone ledges and a final boulder scramble that rewards you with the arch itself — move deliberately, use hands on rough surfaces, and keep cadence steady. Trail signage is present but sparse; pay attention to cairns and junction markers so you don’t drift off the carved route. Along the way the terrain opens to sweeping scenic viewpoints where you can pause, breathe, and reclaim perspective. Travel light, wear grippy shoes, and trust your footing to feel free.
What to Pack and Wear for the Hike
Sunshine and switchbacks will shape what you bring, so pack smart: sturdy hiking shoes, layered clothing for temperature swings, and a small daypack with water, snacks, sunscreen, and a basic first-aid kit. Think freedom — choose hiking gear that lets you move confidently over rocks and sand. Consider weather considerations: mornings can be cool, afternoons hot, and wind picks up suddenly.
- Footwear: grippy trail shoes, comfy socks, gaiters if dusty.
- Clothing: moisture-wicking base, insulating layer, sun-protective hat.
- Essentials: 2L water, high-energy snacks, sunscreen, sunglasses.
Keep your load light and intentional so you stay unburdened. Pack a lightweight map or offline GPS, and respect the trail’s fragile beauty.
Safety Tips and Desert Etiquette
Want to stay safe and leave no trace? You’ll move through red-rock solitude with purpose: carry plenty of water, start early to beat heat, and pace yourself—desert sun strips strength fast. Keep a map or phone with offline directions and tell someone your plan. Practice wildlife awareness: give animals space, don’t feed or approach them, and secure food so critters don’t become reliant. Follow strict trail etiquette—stay on marked paths, yield to uphill hikers, and step aside for passing groups. Pack out all trash, bury human waste where allowed, and avoid disturbing plants or rock art. These actions protect the landscape and free you; respect here equals freedom to return and to roam responsibly.
Photography Tips and Best Vantage Points
You’ll get the best colors at golden hour, so plan your hike for sunrise or late afternoon to catch soft light and long shadows. Use simple composition tricks — leading lines, foreground interest, and the rule of thirds — to make the arch and surrounding red rock pop. Scout the top of the bridge, the switchback overlook, and the lower trail ledges for varied vantage points and perspectives.
Best Light Times
When should you aim to be at Devil’s Bridge for the best light? You’ll chase golden hour glow and watch weather conditions shift the scene — clear mornings warm the red rock, while light cloud softens contrast for moody freedom shots. Arrive early to stake a vantage, then move as light evolves.
- Sunrise (golden hour): first light bathes the arch, cool air, few people — claim composition and breathe free.
- Late morning (if overcast): even light reveals texture without harsh shadows — good for intimate detail.
- Sunset (golden hour): warm backlight silhouettes the bridge; plan exit timing to avoid hiking in dark.
Keep gear light, meter for highlights, and embrace spontaneous moments that liberate your vision.
Composition Tricks
Although the arch itself commands attention, your composition will make the shot — so move around, change lenses, and think in layers to turn a souvenir into a story. You’ll explore composition angles, shift perspective, and use foreground elements to free the image from cliché. Try wide focal length to embrace sky and canyon, then tighten to isolate textures. Frame people small against the arch for scale and liberation. Use diagonal lines and negative space to create motion and intent. Anticipate light; silhouette at sunrise, warm rim light at golden hour. Edit with restraint: crop for impact, boost contrast, keep colors honest. Be bold, deliberate, and mindful—your choices are the path to iconic, personal images.
| Element | Purpose | Tip |
|---|---|---|
| Foreground | Depth | Include rocks/plants |
| Angle | Drama | Low/diagonal |
| Focal length | Context | Wide vs tele |
| Scale | Story | Add a person |
| Light | Mood | Backlight/sidelight |
Top Vantage Spots
Where should you stand to turn Devils Bridge from a nice snapshot into a memorable image? Position yourself with intention: seek high edges, eye-level bridge shots, and wide panoramas that free your frame. Walk to each vantage point and feel choices open.
- Stand left of the bridge on the upper rock for a dramatic arch silhouette against sky—use sunrise light for liberation in color.
- Step to the right scenic overlook to capture depth: foreground stones, the bridge midground, canyon beyond—use a small aperture.
- Move to the lower trail for a wide-angle shot that includes hikers to scale the scene—embrace motion with a slightly slower shutter.
Scout these vantage points, pick one, and shoot with purpose.
Strategies to Avoid Crowds and Peak Times
Want to skip the crowds at Devils Bridge Trail? Use clear crowd management and timing strategies: go at sunrise or late afternoon, midweek, and in shoulder seasons to reclaim solitude. You’ll beat tour buses, feel the cool air, and capture light that flatters the red rock. Pack a headlamp for pre-dawn approaches, move efficiently, and pause where views free you. If you prefer midday, choose the longer, less traveled West Fork route to avoid congestion. Monitor trailhead parking apps and social feeds for real-time crowd hints, then adjust plans. Stay flexible—shift your hour, route, or day to seize quiet moments. These practical choices free you to experience Devils Bridge on your terms.
Frequently Asked Questions
Are Drones Allowed at Devils Bridge?
No — you can’t fly drones at Devils Bridge; federal and local drone regulations plus photography guidelines restrict unmanned aircraft in the Red Rock Secret Mountain Wilderness. You’ll need permits elsewhere, respect closures, and protect the landscape.
Is the Trail Dog-Friendly and Are Leashes Required?
Yes — you can bring dogs, but they must stay leashed; you’ll manage better by enforcing good dog behavior and practicing trail etiquette. Keep control, pack waste bags, respect other hikers, and savor the freeing views together.
Are There Restroom Facilities at the Trailhead or Nearby?
Yes — and no: you’ll find basic restroom hours posted at the trailhead restroom, but nearby facilities in town offer longer hours and cleaner options. Bring supplies, plan breaks, and don’t expect luxury on the trail.
Can You Bring a Picnic or Have a Campfire Near the Bridge?
You can picnic near the trail but not on the bridge; follow fire regulations strictly—campfires and open flames are usually prohibited, so pack a cold picnic, leave no trace, and reclaim freedom responsibly in the red rocks.
Is the Trail Accessible for People With Mobility Impairments?
No — the trail isn’t fully accessible; steep, rocky trail surface conditions limit wheelchair access, but you can still feel liberated — seek alternative viewing options like nearby pullouts or guided tours that offer easier access and vivid vistas.
Conclusion
Plan your visit for sunrise or late afternoon so you’ll enjoy cooler air and softer light — but don’t think the day’s over if you miss the best window. Arrive early, carry water, and respect the desert; the trail demands attention despite its moderate grade. Stick to the route, watch exposed sections, and be ready with your camera — because when you round that last outcrop, the view of Devils Bridge will stop you cold.