You’ll want to time your visit for the light—those narrow beams and warm, layered walls change by the minute—so plan and pack like you mean it. You’ll learn the differences between Upper’s shafts and Lower’s twists, why a tripod is nonnegotiable, and how to compose around flowing lines and crowds. There’s practical gear, permit details, and etiquette to cover, plus a few techniques that make your images feel honest and alive.
Why Choose a Photography Tour of Antelope Canyon
Because light behaves like a painter inside the slots, a photography tour of Antelope Canyon turns a walk into a deliberate hunt for color, texture, and shadow—you’ll learn when to wait for beams, how to frame sweeping curves, and where the sandstone reveals its finest striations. You’ll move with intention, noticing granular detail: the way the rock absorbs warmth, the cool blue in a shaded fold, the thin dust that turns a beam into a visible knife. Photography benefits here aren’t just better images — they’re lessons in seeing. With guided expertise you’ll access angles, timing, and safety you wouldn’t find alone. You’ll leave feeling freer, equipped to chase light and interpret landscape on your own.
When to Visit: Best Times for Light Beams and Soft Glow
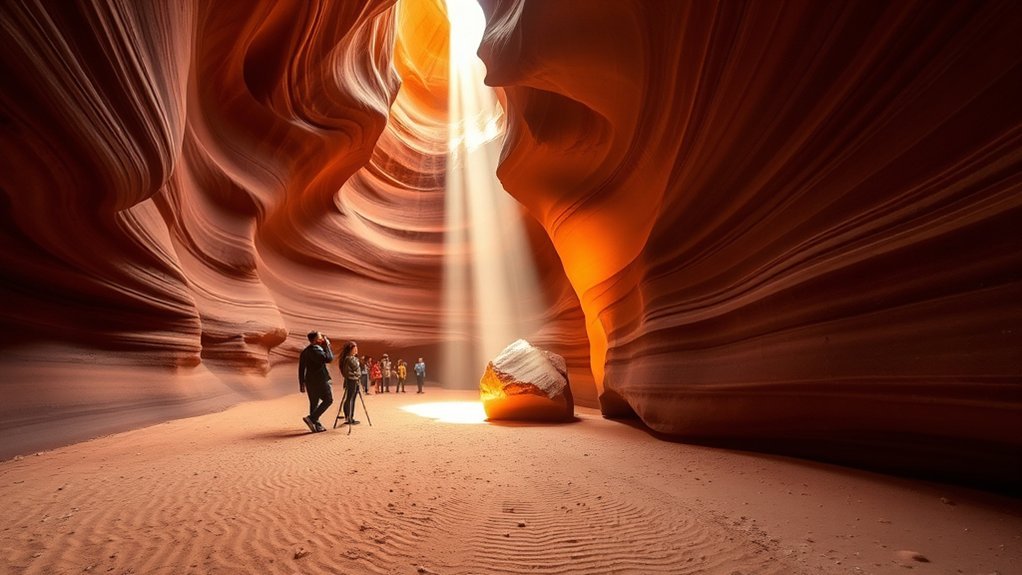
When sunlight cuts just right through the canyon’s narrow mouth, you’ll see beams spill like liquid gold into the chambers below, and timing is everything: midday (roughly 11 a.m.–1:30 p.m.) during the summer months brings the strongest, most defined light shafts, while early morning and late afternoon offer a softer, warmer glow that emphasizes the sandstone’s layered colors and textures. You’ll plan visits by solar angle and season: peak light beam photography happens in summer when the sun climbs high; shoulder seasons yield less intense beams but richer canyon glow across strata. Move intentionally, breathe, and let the light free you—arrive early to scout compositions, or wait for that decisive shaft at noon to capture the canyon’s voice.
Understanding the Types: Upper vs. Lower Antelope Canyon
You’ll notice Upper and Lower Antelope feel like two different worlds once you start watching the light and timing play across the walls. Pay attention to access and terrain — one’s a flat, easy walk while the other asks for ladders and tighter squeezes. That contrast shapes the photography challenges you’ll face, from composing beam shots in wide-open chambers to managing low-light stretches in narrow corridors.
Light and Timing
Although the light shifts quickly through both canyons, you’ll notice very different moods between Upper and Lower Antelope: Upper favors dramatic vertical shafts and high-contrast beams during midday, while Lower rewards you with softer, diffused ribbons of color that linger longer into the morning and late afternoon. You’ll plan shoots around natural lighting — Upper’s noon shafts demand quick reflexes and controlled exposure, while Lower’s subtler glow lets you explore textures and curves. Aim for golden hour edges when colors deepen without harsh shadows, but don’t ignore midday in Upper if you want those iconic beams. Move deliberately, frame tight, and let the canyon’s light liberate your vision: timing transforms shapes into stories you can capture and carry.
Access and Terrain
Because access and terrain shape every decision you make in Antelope Canyon, know that Upper and Lower offer very different physical experiences: Upper is flat, open, and wheelchair-accessible with a short walk from the parking area into wide, sunlit slots, while Lower demands stair descents, narrow squeezes, and uneven footing that reward agility and careful footing. You’ll choose routes that match your desire for freedom — calm, level access routes in Upper or adventurous, vertical terrain features in Lower. Read the canyon, move deliberately, and respect limits while pushing boundaries.
| Canyon | Access routes | Terrain features |
|---|---|---|
| Upper | Short walk, flat | Wide, sunlit slots |
| Lower | Stairs, narrow | Tight passages, ladders |
| Tips | Guide-led entry | Watch footing, conserve energy |
Photography Challenges
Having noted how access and terrain shape your movements, you’ll find the photographic challenges in Upper and Lower are equally shaped by light, space, and movement. You’ll navigate narrow slots in Lower where dynamic angles demand bold composition strategies: embrace diagonal lines, negative space, and close-up textures to free your frame from claustrophobia. In Upper, broader chambers gift shafts and drifting dust that reward patient exposure control and refined lighting techniques; meter for highlights, use fill or reflectors, and bracket to capture range. You’ll move deliberately, feet steady, breathing with the canyon’s rhythm, switching lenses and ISOs like tools of liberation. Anticipate crowds, adapt poses, protect gear, and let constraints sharpen your vision rather than limit it.
Booking Your Tour: Reservations, Permits, and Tour Types
One clear step before you set foot in the slot is booking: snag your reservation, confirm permits, and pick the tour type that matches your goals. You’ll watch tour availability and compare group sizes—private, small, or standard—to choose freedom over crowds. Reserve early, note cancellation policies, and verify Navajo permit details; that paperwork enables you to roam with purpose. Decide whether a photography-specific tour or general walk fits your vision. Expect guides to manage timing for light shafts and safety. Trusting the right format grants creative liberty.
| Choice | Vibe | Outcome |
|---|---|---|
| Private | Intimate | Control |
| Small | Focused | Flow |
| Standard | Social | Energy |
| Photo tour | Intentional | Mastery |
What to Bring: Essential Camera Gear and Accessories
If you want clean, high-contrast images that capture the canyon’s curves and light shafts, pack deliberately: a sturdy tripod, a wide-angle lens (16–35mm or similar), and a camera body you know how to operate in low light. Bring extra batteries and memory cards — you’ll shoot more than you expect — plus a small microfiber cloth and blower to clear grit. Consider tripod options: a compact travel tripod for tight spaces or a heavier model if you value absolute steadiness. For lens choices, include a fast prime for detail and a wide zoom for context; a 24mm or 35mm can be liberating when space feels oppressive. Carry gear in a soft case for quick access and dust protection. Stay nimble, stay bold.
Camera Settings for Challenging Canyon Light
You’ll learn to expose for the brightest shafts so those luminous ribbons don’t blow out while preserving the mystery in the darkest recesses. Balance comes from careful shadow management and selective metering or bracketed exposures. Use a tripod, low ISO, and precise focus to keep textures razor-sharp through long exposures.
Exposing for Highlights
Because canyon light can blow out bright beams while plunging adjacent walls into shadow, aim to protect the highlights first—those blown whites are usually unrecoverable. You’ll meter for highlight exposure, spot or use exposure compensation to stop down until the brightest beams retain texture. Watch your histogram; keep the right edge from clipping while letting midtones fall where they naturally do. Use low ISO, sturdy tripod, and slower shutter speeds so you don’t inflate highlights to save shadow detail. Bracketing can be your liberation: capture multiple exposures to blend later and honor the canyon’s full dynamic range. Move deliberately, read the light, and choose safety for highlights—then you’ll craft images that feel both truthful and free.
Managing Deep Shadows
When you push into the canyon’s darker pockets, prioritize stopping noise and preserving shadow texture over immediately brightening everything. You’ll dial ISO low, expose for shadow details, and nudge exposure compensation only when highlights stay safe. Embrace subtle contrast management: pull midtones with careful curves rather than blasting shadows in-camera. Watch for color shifts in deep crevices and rescue them in RAW, not by over-lifting JPEGs. Move, observe angles, and let shafts of light guide selective metering. You want liberation from technical fear, so practice restraint and trust post-processing.
| Setting | Purpose | Tip |
|---|---|---|
| Low ISO | Minimize noise | Use RAW |
| +0.3 EV | Gentle lift | Check highlights |
| Curves | Contrast management | Preserve shadow details |
Stabilization and Sharpness
A steady setup makes the difference between tack-sharp canyon details and a smeared disappointment, so brace your camera and choose settings that prioritize stability over haste. You’ll feel freer to explore compositions when a tripod anchors you; lock your head, use a remote release or two-second timer, and disable in-body image stabilization if your tripod makes IS conflict. Dial to a low ISO for clean files and let shutter speed follow exposure, but keep it above the threshold where subject movement blurs — or embrace motion creatively. Stop down modestly to enhance lens sharpness without inviting diffraction; f/5.6–f/11 is often ideal. Check focus manually or with single-point AF, zoom in on the LCD to confirm, and shoot multiple frames to secure one impeccable capture.
Composition Tips: Making the Most of Lines, Textures, and Color
Start by letting the canyon itself direct your framing: eye the sweeping curves, sharp ridges, and layered striations to lead a viewer through the frame, then place your subject—rock, light beam, or shadow—so those natural lines converge or diverge toward it. You’ll use line dynamics to push motion, depth, and intent; texture exploration reveals subtle grooves, grit, and polish under soft bounce light. Move close to isolate patterns, step back to show scale, and rotate your camera to let curves become diagonal energy. Compose for freedom—don’t be trapped by rules; let the canyon rewrite them.
- Seek converging lines to anchor a focal point and imply journey.
- Use foreground textures to create tactile depth and invite touch.
- Balance warm sandstone hues against cool shadow for liberated contrast.
Working With Light Beams and Moving Crowds
Plan your visit around mid-morning when the sun’s angle produces the strongest beams, and watch how crowds thin and swell as light shifts. Use people as scale and motion—position them deliberately or capture them moving through shafts to add life without cluttering the frame. Dial in narrower apertures, lower ISOs, and shutter speeds that balance sharp shafts with intentional blur for figures.
Timing for Peak Beams
When will the canyon deliver its most dramatic light beams depends on sun angle, season, and how quickly crowds move through each slot; you’ll want to be on-site when the sun’s high enough to punch through the narrows but before tour groups have splintered the light into a hundred competing flashes. You’ll learn ideal times by watching seasonal variations and arriving with intention. Move deliberately, claim a small patch of ground, and wait.
- Midday peak windows — summer months give the strongest shafts; arrive early in that window to outmaneuver arriving groups.
- Shoulder seasons — spring and fall shift angles; beams can be longer, softer, and less crowded.
- Quick recce — scout entry points so you can pivot when a beam briefly appears.
Composing With Moving People
Although the canyon’s light feels static from a distance, you’ll quickly learn it’s choreography—beams sweep, crowds flow, and moments open and close in seconds—so position yourself to read movement as much as light. You’ll watch crowd dynamics like currents, anticipating where people will cluster and when a gap will appear. Move deliberately: pick a vantage, then use movement techniques — panning, timed bursts, or intentional waits — to capture a figure slipping into a shaft or a silhouette dissolving into amber dust. Embrace improvisation; the canyon rewards bold composition and quick decisions. Let groups become scale, rhythm, and contrast, not obstacles. When you surrender control to the scene’s tempo, your images gain freedom and narrative.
Camera Settings for Shafts
Because light shafts change by the second, you’ll set camera parameters that let you react fast while holding control over exposure and motion. You’ll embrace spontaneity: choose shutter speed to freeze or blur people and dust, and tweak aperture settings to control depth and brightness. Move freely, but think like a technician.
- Start with 1/125–1/250s to freeze drifting dust; stop down f/5.6–f/8 for crisp beams and manageable highlights.
- If you want motion trails, drop to 1/15–1/2s, use a stable stance or monopod, and open aperture to f/2.8–f/4 to keep light flowing.
- Use spot or center-weighted metering, raise ISO sparingly, and bracket exposures so you won’t lose the moment.
Respectful and Safe Photography Practices on Navajo Land
If you want strong images and a meaningful visit, follow Navajo rules and common-sense safety at all times: stay on designated paths, ask permission before photographing people or ceremonies, and keep gear and pets from trampling fragile sandstone and vegetation. You’ll practice ethical photography by respecting land stewards, guides, and signage; ask clear questions, honor refusals, and credit the place and people in captions. Move deliberately: watch footing, secure straps, and avoid crowding narrow corridors. Frame shots that uplift place over possession, capturing light and texture without exploiting culture. Carry water, a small first-aid kit, and leave no trace. You’ll feel liberated photographing responsibly — your images will be truer, and your presence will help preserve these canyons for generations.
Post-Processing Tips to Preserve the Canyon’s Natural Look
When you edit Antelope Canyon images, aim to reveal what you saw rather than invent new drama; subtle tweaks keep the sandstone’s soft gradients and delicate striations believable. You want post processing techniques that free the scene, not chain it to trends. Work with restraint, read the light, and let textures breathe.
- Adjust exposure and contrast sparingly — lift shadows to show striations, tame highlights to protect airy beams, and keep natural color preservation as your north star.
- Use local adjustments to refine curves and clarity only where detail needs recovery; avoid global boosts that flatten depth.
- Calibrate white balance and vibrance gently so hues stay honest, embracing the canyon’s raw palette while honoring your adventurous eye.
Frequently Asked Questions
Are Drones Allowed for Aerial Photography Over Antelope Canyon?
No — you can’t fly drones over Antelope Canyon; tribal and federal drone regulations enforce aerial restrictions for safety and preservation. You’ll respect boundaries, seek permits where possible, and savor ground-level views that feel liberating and precise.
Can Tripods Be Checked or Rented at the Canyon Entrance?
Right off the bat, you can’t check tripods at the entrance; tripod rental is sometimes offered by guides, but photography restrictions vary, so you’ll want to confirm availability beforehand and embrace creative workarounds to stay free and nimble.
Is Flash or Artificial Lighting Permitted Inside the Canyon?
No — you shouldn’t use flash or artificial lighting; natural lighting shapes the slot’s drama, so you’ll respect photography etiquette, move deliberately, seek liberated compositions, and adapt to shifting beams for adventurous, detail-rich images without intrusive gear.
Are There Photography Workshops That Include Navajo Guide Instruction?
Yes — 78% of tours feature Navajo guide instruction; you’ll learn Navajo culture and advanced photography techniques, and you’ll explore slot canyons with observational, detail-oriented guidance that frees your creativity and sharpens adventurous vision.
What Are the Rules for Commercial Photography or Filming Permits?
You must obtain a permit application, pay photography fees, and follow Navajo Nation rules, scheduling, safety guidelines, and guide requirements; you’ll coordinate logistics, respect sacred spaces, and pursue adventurous, liberated creative work responsibly.
Conclusion
You’ve followed the light and learned the canyon’s quiet grammar; now you stand where shadows speak. Like an old cartographer tracing hidden maps, you’ll frame curves, balance beams, and honor each grain of stone. Trust your timing, pack patience, and treat the slot with reverence—its stories belong to the land and its people. When you leave, carry images that are honest guides, not trophies, reminding you why some places demand careful, curious hands.