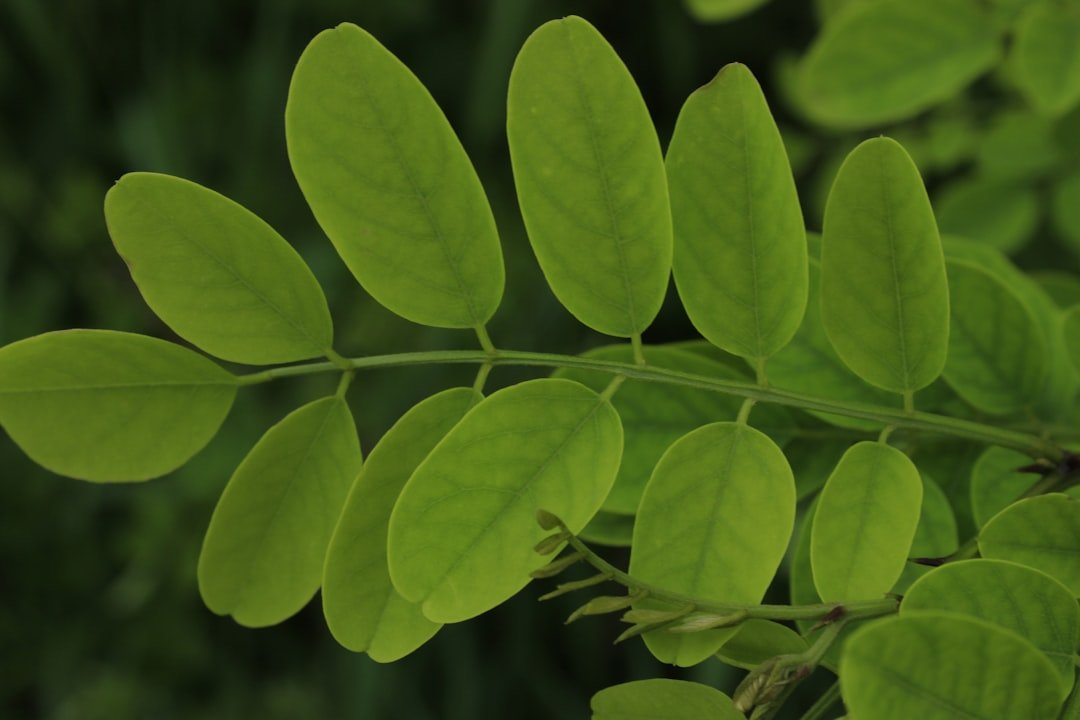
The curry plant, scientifically known as Murraya koenigii, is a tropical and subtropical shrub native to India and other parts of Southeast Asia. It is renowned for its aromatic leaves, which are a staple in Indian cuisine, imparting a distinct flavor to various dishes. The plant can grow up to 1-2 meters in height and features small, white flowers that bloom in clusters, followed by small black berries.
The leaves are pinnate, with a glossy green appearance, and are often used fresh or dried in cooking. Beyond its culinary uses, the curry plant is also valued for its medicinal properties, including its potential to aid digestion and improve overall health. Understanding the growth habits of the curry plant is essential for successful cultivation.
It thrives in warm climates and prefers well-drained soil with plenty of sunlight. The plant is sensitive to frost and cold temperatures, making it unsuitable for regions with harsh winters. In addition to its culinary and medicinal benefits, the curry plant is also appreciated for its ornamental value, often used in landscaping due to its lush foliage and attractive flowers.
Cultivating this plant can be a rewarding endeavor for both home gardeners and professional horticulturists alike.
Key Takeaways
- The curry plant is a small shrub native to India and Sri Lanka, known for its aromatic leaves used in cooking.
- When choosing curry plant seeds, look for a reputable supplier and select seeds that are fresh and high quality.
- Prepare the soil for seedlings by ensuring it is well-draining and rich in organic matter, and use a seed starting mix for best results.
- Plant curry plant seeds in a warm, sunny location with well-draining soil, and keep the soil consistently moist but not waterlogged.
- Provide the right conditions for growth by maintaining a warm and sunny environment, and protect the plants from cold temperatures.
Choosing the Right Seeds
Selecting the right seeds is a critical step in cultivating a healthy curry plant. When sourcing seeds, it is advisable to choose high-quality seeds from reputable suppliers or nurseries that specialize in herbs and spices. Fresh seeds have a higher germination rate compared to older seeds, which may have diminished viability.
Additionally, it is beneficial to look for seeds that are specifically labeled as Murraya koenigii to ensure that you are planting the correct variety. Another option for those who may not have access to seeds is to propagate the curry plant from cuttings. This method involves taking healthy stems from an existing plant and encouraging them to root in a suitable medium.
While seed propagation can take longer, cuttings can provide a more immediate way to establish new plants. Regardless of the method chosen, understanding the genetic background of the seeds or cuttings can help ensure that the plants will thrive in your specific growing conditions.
Preparing the Soil for Seedlings
The foundation of any successful garden lies in the quality of its soil. For curry plants, well-draining soil is paramount to prevent root rot and other moisture-related issues. A mixture of loamy soil combined with organic matter such as compost or well-rotted manure can create an ideal environment for seedlings.
This blend not only provides essential nutrients but also improves soil structure, allowing for better aeration and drainage. Before planting, it is advisable to test the soil pH, as curry plants prefer slightly acidic to neutral conditions (pH 6.0 to 7.0). If necessary, amendments can be made using lime to raise pH or sulfur to lower it. Additionally, incorporating perlite or sand into the soil mix can enhance drainage further, ensuring that excess water does not accumulate around the roots. Preparing the soil adequately sets the stage for healthy seedling development and ultimately contributes to a robust curry plant.
Planting the Seeds
| Month | Number of Seeds Planted | Germination Rate (%) |
|---|---|---|
| January | 200 | 85% |
| February | 180 | 90% |
| March | 220 | 88% |
Once the soil is prepared, it’s time to plant the seeds. The ideal time for sowing curry seeds is during the warm months when temperatures consistently exceed 20°C (68°F). This temperature range promotes optimal germination rates.
Seeds should be sown at a depth of about 1-2 centimeters in the prepared soil mix, with adequate spacing between them to allow for growth. If planting multiple seeds in a single container, spacing them at least 5-10 centimeters apart can help prevent overcrowding. After planting, it is crucial to gently water the soil without displacing the seeds.
A fine mist or light watering can help maintain moisture levels without washing away the soil. Covering the container with a plastic wrap or placing it in a greenhouse can create a humid environment that encourages germination. Regular monitoring of moisture levels is essential during this period; overwatering can lead to fungal issues while underwatering can hinder seedling development.

Providing the Right Conditions for Growth
Creating an environment conducive to growth is vital for young curry plants. They thrive in bright, indirect sunlight; therefore, placing them near a south-facing window or under grow lights can provide adequate light exposure without subjecting them to harsh direct sunlight that could scorch their delicate leaves. Maintaining a temperature range between 20°C and 30°C (68°F – 86°F) will further support their growth.
Humidity also plays a significant role in the development of curry plants. They prefer higher humidity levels, typically around 50-70%. If growing indoors, using a humidity tray filled with water and pebbles beneath the pots can help maintain moisture levels in the air around the plants.
Alternatively, misting the leaves occasionally can also provide additional humidity while keeping an eye on preventing any fungal growth that excessive moisture might encourage.
Products Worth Considering

Full Spectrum & Natural Light: A19 full spectrum grow light appears 4000K white to the eye but has a red/blue light spectrum. Same as natural sun shine, perfect for tomatoes, cucumbers, peppers, leafy greens and herbs at all growth stages.
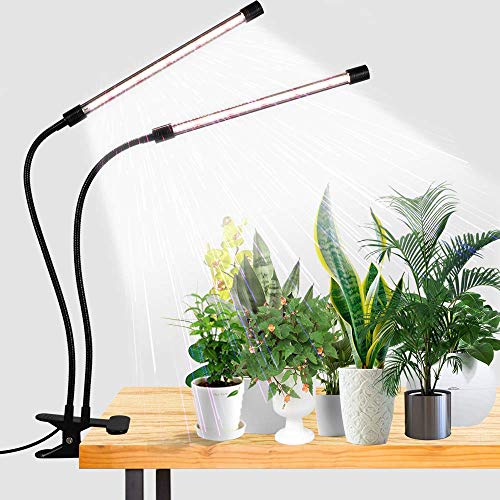
6000K White Light - equipped with 10 Red + 74 White LEDs, this growing Lamp is similar to the full-spectrum sunlight at noon,that is professionally designed for indoor garden plants.Moreover, its color rendering index is as high as 95, the light is soft and flicker-free, which is very suitable for reading lamp

NOTE: The product stand needs to be pressed down by the flower pot to be stable. Not wireless style. 2 Installation Methods: Specially designed plant light for indoor plants, which can be inserted in the soil or stand for lighting.Unique and easy to assemble and disassemble.
Watering and Fertilizing
Watering practices are crucial for nurturing healthy curry plants. The soil should be kept consistently moist but not soggy; allowing the top inch of soil to dry out between waterings is generally a good rule of thumb. Overwatering can lead to root rot, while underwatering can cause stress and hinder growth.
Organic options such as fish emulsion or seaweed extract can provide essential nutrients without overwhelming young roots with synthetic chemicals.
As plants mature, transitioning to a slow-release fertilizer can support ongoing growth while minimizing the risk of nutrient burn.
Products Worth Considering

HELPS REGULATE SOIL MOISTURE: Miracle-Gro Organic Indoor Potting Soil Mix is an organic potting soil that protects indoor plants against over and under watering

OUTDOOR POTTING SOIL: Miracle-Gro Organic Outdoor Potting Mix contains a quick-release natural plant fertilizer and also feeds plants for up to 2 months

ALL-NATURAL MIX: Burpee Organic Premium Potting Mix is formulated with plant food & coconut coir to promote seed & root growth and healthy flower, vegetable & herb plants. OMRI Listed for organic use.
Managing Pests and Diseases
Like any other plant, curry plants are susceptible to various pests and diseases that can hinder their growth and productivity. Common pests include aphids, spider mites, and whiteflies, which can sap nutrients from the leaves and weaken the plant over time. Regularly inspecting your plants for signs of infestation—such as discolored leaves or webbing—can help catch problems early on.
Integrated pest management (IPM) strategies can be effective in controlling these pests without resorting to harsh chemicals. Introducing beneficial insects like ladybugs or using insecticidal soap can help manage pest populations naturally. Additionally, maintaining good air circulation around plants and avoiding overcrowding can reduce humidity levels that favor pest infestations.
Fungal diseases such as powdery mildew may also occur; ensuring proper watering practices and spacing between plants can mitigate these risks.
Products Worth Considering

PEST DEFENSE - Insecticidal Super Soap controls species of adelgid, ant, aphid, borer, caterpillar, spider mite, cricket, chinch bug, weevil, fly, thrip, & more.

GENTLE ON MOST PLANTS - This aphid spray is ideal for use on flowers, herbs, vegetables, houseplants, lawn, tree, shrubs, and more

EASY TO USE: The ready-to-use indoor bug spray bottle makes application easy
Transferring Seedlings to Larger Pots
As seedlings grow, they will eventually outgrow their initial containers, necessitating a transfer to larger pots. This process typically occurs when seedlings develop their second set of true leaves, indicating they are ready for more space and nutrients. Gently removing seedlings from their current pots requires care; using a small trowel or your fingers can help minimize root disturbance.
When transferring seedlings, choose pots that are at least 10-15 centimeters (4-6 inches) in diameter to allow ample room for root expansion. Fill these pots with fresh potting mix that retains moisture while providing good drainage. After placing each seedling into its new pot, gently firm the soil around it and water thoroughly to eliminate air pockets and ensure good contact between roots and soil.
Hardening Off the Seedlings
Before planting seedlings outdoors, it is essential to acclimate them through a process known as hardening off. This gradual exposure helps seedlings adjust from their sheltered indoor environment to the harsher outdoor conditions they will face once planted in the garden. Start by placing seedlings outside in a shaded area for a few hours each day, gradually increasing their exposure to sunlight over one to two weeks.
During this hardening-off period, monitor seedlings closely for signs of stress such as wilting or leaf burn. If temperatures drop significantly at night or if strong winds are present, it may be necessary to bring them back indoors temporarily until conditions improve. This careful acclimatization process helps ensure that seedlings are robust enough to thrive once planted in their permanent outdoor location.
Planting Seedlings in the Garden
Once seedlings have been adequately hardened off and are ready for transplanting, selecting an appropriate location in your garden is crucial for their success. Choose a spot that receives full sun for at least six hours daily while ensuring that the soil is well-draining and rich in organic matter. Preparing the garden bed by loosening the soil and incorporating compost will create an ideal environment for growth.
When planting seedlings outdoors, dig holes that are slightly larger than each seedling’s root ball and space them about 60 centimeters (24 inches) apart to allow for mature growth. Carefully place each seedling into its hole, ensuring that it sits at the same depth as it was in its pot. Backfill with soil and water thoroughly after planting to help settle the soil around the roots.
Harvesting and Using Curry Leaves
Harvesting curry leaves is one of the most rewarding aspects of growing this aromatic plant. Once established, you can begin harvesting leaves when they reach a sufficient size—typically around three months after planting seedlings outdoors. To harvest, simply pluck individual leaves or cut entire sprigs from the plant using clean scissors or pruning shears.
Curry leaves are best used fresh but can also be dried for later use; however, drying may diminish some of their flavor intensity. In culinary applications, they are often sautéed in oil at the beginning of cooking to release their aromatic oils before adding other ingredients like vegetables or meats. Their unique flavor profile enhances various dishes such as curries, soups, and rice preparations.
In addition to culinary uses, curry leaves have been traditionally used in Ayurvedic medicine for their potential health benefits, including antioxidant properties and digestive support. Incorporating fresh curry leaves into your diet not only elevates your meals but also contributes positively to your overall well-being.
FAQs
What is a curry plant seedling?
A curry plant seedling is a young plant that is grown from the seeds of the curry plant, which is a herb native to the Mediterranean region.
How do you grow curry plant seedlings?
Curry plant seedlings can be grown from seeds by sowing them in well-drained soil and keeping them in a warm, sunny location. They require regular watering and can be grown indoors or outdoors.
What are the uses of curry plant seedlings?
Curry plant seedlings are grown for their aromatic leaves, which are used to flavor dishes in cooking. They are also used for their medicinal properties and as ornamental plants in gardens.
How long does it take for curry plant seedlings to grow?
Curry plant seedlings typically take 2-3 weeks to germinate and can be harvested for their leaves within a few months of planting.
What are the ideal growing conditions for curry plant seedlings?
Curry plant seedlings thrive in well-drained soil, full sunlight, and warm temperatures. They are drought-tolerant and prefer a pH level of 6.0-7.0.