Disclosure: As an Amazon Associate, we earn from qualifying purchases. If you click a link on this page and make a purchase, we may receive a small commission at no extra cost to you.
Cloudy headlights can make your car look neglected and reduce the amount of light that reaches the road. The Chemical Guys Headlight Restoration & Ceramic Kit gives you a simple hand-applied way to remove surface haze, improve clarity, and add a ceramic protection step. It works best when the damage is light to moderate. This review will help you decide whether the kit suits your lenses or whether you need a more aggressive sanding system.
Quick Verdict
Rating: 7.5/10, Recommended with caveats
Best For: Drivers who want a complete no-drill kit for lightly hazy or moderately yellowed plastic headlights.
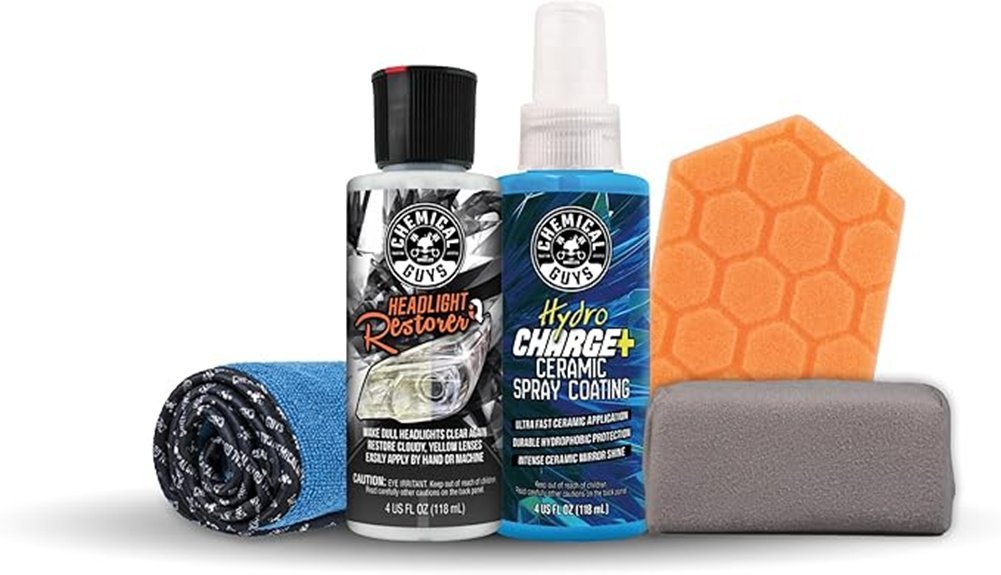
Bottom Line: The kit combines Headlight Restorer IQ, HydroCharge+ ceramic coating, and reusable application accessories in one box. Its main limitation is cutting power, so badly oxidized, deeply scratched, or pitted lenses may still need wet sanding or a drill-powered kit.
| Specification | Detail |
|---|---|
| Brand | Chemical Guys |
| Model | GAP401R1 |
| ASIN | B0FB1H813L |
| Product Type | Headlight restoration and ceramic protection kit |
| Package Dimensions | 4 x 3.5 x 10 inches |
| Package Weight | 1.04 pounds |
| Treatment Products | 4 oz Headlight Restoration Compound and 4 oz HydroCharge+ Ceramic Coating Spray |
| Included Accessories | Microfiber towel, MicroSuede applicator, and dual-sided Hex-Logic foam hand pad |
| Application Method | By hand; no drill or polishing machine required for the standard process |
| Compatible Surfaces | Clear plastic headlights, taillights, fog lights, turn signals, and exterior plastic lenses |
| Best Use | Light haze, yellowing, surface oxidation, and maintenance |
| Not Included | Sandpaper, drill attachment, masking tape, gloves, or eye protection |
What Is the Chemical Guys Headlight Restoration & Ceramic Kit?
The Chemical Guys GAP401R1 is a DIY kit for restoring clear automotive plastic lenses. It pairs Headlight Restorer IQ with HydroCharge+ Ceramic Coating Spray, so you can polish away surface oxidation and then apply a protective coating without buying separate pads or towels.
The kit is designed for drivers who want a controlled hand-polishing process instead of wet sanding or using a drill. You receive two 4 oz treatment bottles, a dual-sided Hex-Logic hand pad, a microfiber towel, and a MicroSuede coating applicator. That makes it more complete than a polish-only bottle, but less aggressive than kits that include multiple sandpaper grits.
Before You Buy: Check the lens in daylight. A smooth lens with surface haze is a good match for this kit. A rough, deeply pitted, cracked, or heavily yellowed lens will usually need sanding, professional restoration, or replacement.
How This Review Was Evaluated
This editorial review checked the current Amazon listing, Chemical Guys product guidance, the listed package contents, and independent headlight-kit testing updated in June 2026. The rating focuses on restoration strength, ease of use, completeness, surface compatibility, and the quality of the protection step.
The 7.5/10 score reflects a clear balance. The kit is convenient, includes reusable tools, and avoids a drill-based process. However, independent testing also found that it was better for maintenance than for severe oxidation, which matches the limitations of a hand-polishing system without sanding media.
Who Should Buy It?
Best For
- Drivers with light haze, mild yellowing, or early surface oxidation.
- Beginners who want a hand-applied process with the main accessories included.
- Car owners maintaining headlights, taillights, fog lights, or clear exterior plastic trim.
Skip If
- Your lenses have deep pitting, cracks, severe yellowing, or thick oxidation.
- You need sandpaper, masking tape, gloves, or a drill attachment included.
- The fogging or condensation is inside the headlight housing.
Feature-by-Feature Review
Kit Contents and Reusable Accessories
The package includes the products and tools needed for the listed hand-application process. Headlight Restorer IQ handles the polishing stage, while HydroCharge+ adds the finishing layer. The Hex-Logic foam pad gives you a larger grip than a small wipe, and the microfiber towel removes polishing residue before coating.
The MicroSuede applicator is reserved for spreading HydroCharge+ in straight, even passes. Keeping the coating applicator separate from the polishing pad reduces cross-contamination. The towel, foam pad, and applicator can be reused if you clean and store them according to the product-care instructions.
Restoration Compound Performance
Headlight Restorer IQ uses abrasives to remove faded material from the outer surface of a clear plastic lens. You apply a small amount to the hand pad and work it in overlapping circular motions. Longer, even polishing helps refine light haze, but hand pressure and technique affect the result.
This process is most effective when oxidation has not penetrated deeply. It can improve a dull or yellowed outer layer, but it cannot repair cracks, internal clouding, damaged reflectors, or severe pitting. A second polishing pass may help with stubborn haze, but repeated hand polishing is not a substitute for the leveling action of wet sanding.
HydroCharge+ Ceramic Protection
After polishing and wiping the lens clean, HydroCharge+ adds a ceramic protection step. You spray it onto the MicroSuede applicator and spread it across the lens in even linear motions. The coating is intended to help maintain clarity against sunlight, road film, rain, washing, and daily exposure.
The coating does not make a damaged lens permanent or maintenance-free. Outdoor parking, strong sun, road salt, and frequent washing can reduce how long the finish looks fresh. Inspect the lens during routine washes and reapply the coating when clarity or water behavior begins to decline.
Ease of Use
The standard process does not require a drill, machine polisher, or grit changes. That reduces the risk of uneven sanding marks and makes the kit approachable for a first restoration attempt. It also gives you more control around curved lenses and narrow areas.
The tradeoff is effort. Hand polishing may take more than one pass on moderate oxidation, and the result depends on keeping pressure even across the lens. The kit also leaves prep items to you, including masking tape, gloves, eye protection, and any clay bar needed for bonded contamination.
Surface Compatibility
The products are intended for clear exterior automotive plastic, including headlights, taillights, fog lights, turn signals, and similar clear lenses. They are not meant for painted panels or glass. Test a small hidden area before treating unusual or delicate plastic trim.
Outer-lens restoration will not fix moisture trapped inside the housing, a weak bulb, failed wiring, poor headlight aim, or a damaged reflector. If the lens looks clear after polishing but road visibility remains poor, inspect those other parts of the lighting system.
Compatibility and Safety
Work on a cool, clean lens in a shaded, well-ventilated area. Wear gloves and eye protection, and mask the painted edge and rubber trim around the headlight before polishing. These items are not included, so plan for them before you begin.
Do not use the compound on glass or painted surfaces. Keep the pad clean, because trapped grit can scratch clear plastic. Follow the label directions for application, drying, and coating care, and stop if you see cracking, peeling, or damage that needs professional inspection.
How to Use It Correctly
- Wash and dry the lens. Remove loose dirt, bugs, and road film. Use a clay bar with suitable lubricant only if bonded contamination remains.
- Protect nearby surfaces. Apply painter’s tape around the headlight so compound does not spread onto paint, rubber, or textured trim.
- Polish the plastic. Add a small amount of Headlight Restorer IQ to the Hex-Logic pad and work in smooth, overlapping circles with even pressure.
- Inspect before coating. Wipe away residue with the microfiber towel. Repeat the polishing step only if surface haze remains and the lens is not deeply damaged.
- Apply HydroCharge+. Spray the coating onto the MicroSuede applicator, not directly across the car, then spread it in even linear motions.
- Follow curing guidance. Keep the surface clean and dry for the time stated on the product label before washing or exposing it to heavy moisture.
Pro Tip: Take a close photo of each lens before you start, then inspect it from the same angle after every polishing pass. This helps you stop when the haze is removed instead of overworking an already clear area.
How It Performs in Real Use
For Light Maintenance Haze
This is the kit’s strongest use case. When the lens feels smooth and shows only a cloudy film or early yellowing, the hand pad and compound can improve clarity without a long sanding process. The coating then adds a practical finishing step for continued maintenance.
For Moderately Yellowed Headlights
Moderate yellowing may require firm, even polishing and more than one pass. You can expect better cosmetic clarity when the damage is mainly on the surface, but you should not assume every lens will return to a new appearance. Age, previous restoration work, and coating failure all affect the outcome.
For Heavily Oxidized or Pitted Lenses
This is where the kit becomes less convincing. Independent 2026 testing found that it did not remove severe buildup as effectively as sanding-based competitors. A 3M or Cerakote system with sanding steps may be a better first restoration for rough, deeply yellowed lenses, followed by a lighter polish kit for later upkeep.
For Vehicles Parked Outside
The ceramic step is useful when your vehicle spends most days in sun and weather, but it still needs inspection and maintenance. Wash the lenses with mild car soap, avoid rough shop towels, and reapply protection when the finish stops shedding water or begins to look dull.
Pros and Cons
Pros
- Includes both a 4 oz restoration compound and a 4 oz ceramic coating spray.
- Standard application works by hand without a drill or polishing machine.
- Includes a microfiber towel, MicroSuede applicator, and dual-sided Hex-Logic foam pad.
- Works on several clear exterior plastic lenses, not only headlights.
- Useful as a maintenance kit after an earlier heavy restoration.
Cons
- Limited cutting power on severe oxidation, deep scratches, and pitting.
- Does not include masking tape, gloves, eye protection, or sanding media.
- Results and coating life depend on prep, technique, parking conditions, and maintenance.
Is It Worth the Price?
The Chemical Guys kit offers strong value when you need a complete light-duty restoration system rather than a single bottle of polish. You receive the polishing product, ceramic coating, towel, hand pad, and coating applicator, so most of the working tools are already in the box.
You get the most value when your lenses have early haze or when you want a maintenance kit after a previous restoration. It is not the best fit if the headlights already need sanding, because you will still need another kit or professional service to remove deeper damage.
How It Compares to Alternatives
The 3M Ultra Headlight Restoration Kit is better suited to heavy oxidation because it includes sanding components and a more aggressive correction process. The Cerakote Ceramic Headlight Restoration Kit also uses manual sanding and is a stronger option when the lens needs more than polishing.
The Chemical Guys GAP401R1 makes more sense when you value reusable detailing accessories, a simple hand-polishing step, and a separate ceramic coating. It is easier to approach than a full sanding progression, but it gives up restoration strength on badly neglected lenses.
Maintenance Tips After Restoration
Wash restored lenses with mild automotive soap and a clean microfiber towel. Avoid rough rags, dry wiping, and harsh household cleaners, because they can mark the plastic or weaken the finish. Remove bug residue and road film before they harden.
Inspect the lenses during regular washes. Reapply HydroCharge+ periodically according to the product label and sooner when outdoor exposure is severe. If yellowing returns beneath the coating or the surface feels rough, polishing alone may no longer be enough.
Frequently Asked Questions
Does the Chemical Guys Headlight Restoration & Ceramic Kit require sanding?
No. The listed process uses Headlight Restorer IQ, the Hex-Logic hand pad, a microfiber towel, and HydroCharge+ coating. That makes the kit easier for beginners, but less aggressive than a system with sandpaper.
Can it fix heavily yellowed or pitted headlights?
It may improve the appearance, but it is not the best choice for severe oxidation, deep scratches, or pitting. Those lenses often need wet sanding, machine correction, professional service, or replacement.
Can you use the kit on taillights and fog lights?
Yes. Chemical Guys lists clear plastic headlights, taillights, fog lights, turn signals, and exterior lenses as suitable surfaces. Test a small area first and avoid painted or glass surfaces.
Does the box include tape, gloves, or eye protection?
No. The verified contents include the two treatment products, microfiber towel, MicroSuede applicator, and Hex-Logic foam pad. Supply your own painter’s tape, gloves, and eye protection before starting.
Will it remove condensation inside a headlight?
No. The kit treats the outside of a clear plastic lens. Internal moisture usually points to a seal, vent, housing, or drainage problem that polishing cannot repair.
How many headlights can one kit restore?
The listing provides 4 oz of compound and 4 oz of coating, but it does not promise an exact number of vehicles. Coverage depends on lens size, oxidation level, the number of polishing passes, and how much product you apply.
How often should you reapply HydroCharge+?
Follow the current product label rather than relying on one fixed interval. Inspect the lenses more often when the car is parked outdoors, washed frequently, or exposed to strong sun, road salt, and severe weather.
The Bottom Line
The Chemical Guys Headlight Restoration & Ceramic Kit earns a 7.5/10 for its complete accessory set, simple hand application, and ceramic finishing step. Buy it for light to moderate surface haze or routine upkeep. Skip it when the lens is rough, deeply yellowed, cracked, pitted, or clouded from inside the housing.