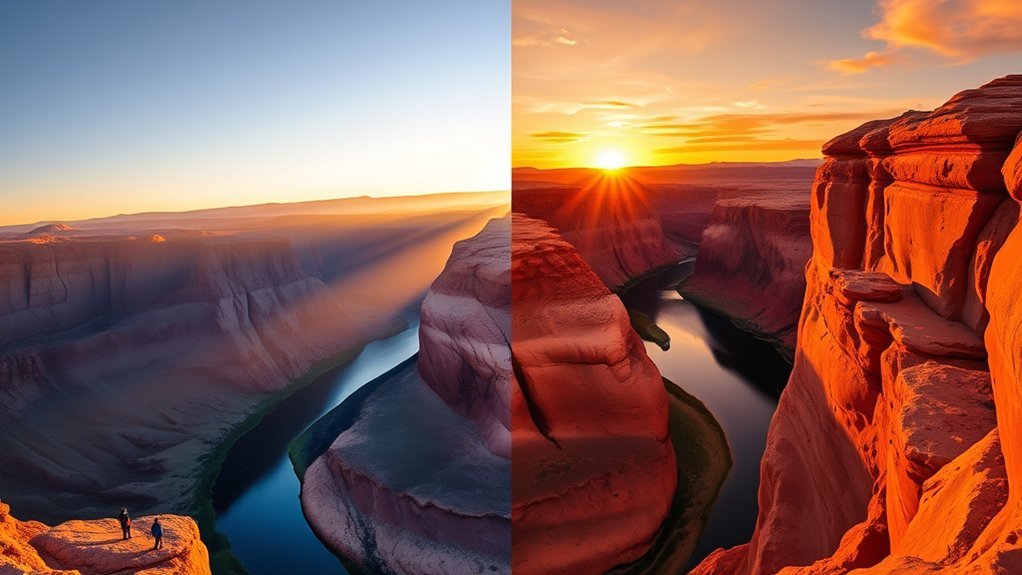
Choosing sunrise or sunset at Horseshoe Bend is mostly a choice between a calmer visit and a more dramatic sky. Sunrise usually brings cooler temperatures, lighter crowds, and gentler front lighting. Sunset can produce colorful skies, silhouettes, and a sunstar, but the canyon itself may become dark. Access hours, weather, and safety matter as much as the light.
Quick Answer
Choose sunrise for a quieter visit, cooler weather, and more balanced light from behind you. Choose sunset for a dramatic sky, backlit silhouettes, and warmer color. Sunset is often more striking, but sunrise is usually easier and less crowded. Normal visitor access begins around sunrise, so do not assume you can enter before dawn.
Key Takeaways
- Sunrise is best for: cooler temperatures, fewer people, calmer conditions, and easier exposure.
- Sunset is best for: colorful skies, sunstars, silhouettes, and dramatic backlighting.
- The canyon can remain partly shadowed at sunrise and become very dark near sunset.
- The official trail is 1.5 miles round trip, with limited shade and no drinking water along the route.
- Normal access is from sunrise to sunset. Check current City of Page hours, fees, weather, and alerts before leaving.
Sunrise vs. Sunset at a Glance
| Factor | Sunrise | Sunset |
| Best For | Solitude, cooler weather, balanced exposures | Colorful sky, silhouettes, backlighting |
| Crowds | Usually lighter | Often busiest near golden hour |
| Canyon Light | Gradually brightens; lower canyon may stay shadowed | Strong backlight; canyon may become dark |
| Main Drawback | Normal access does not begin before sunrise | Crowds, glare, and a walk back in fading light |
| Recommended Arrival | At the entrance around opening time | 60–90 minutes before sunset |
Why Timing Changes the View at Horseshoe Bend
Horseshoe Bend is a deep, roughly 1,000-foot canyon. The rim, inner walls, river, and sky do not receive the same light at the same time. Even when the sky is bright, parts of the canyon may remain in heavy shadow.
The overlook generally faces west. At sunrise, the sun rises behind you and gradually illuminates the landscape in front of you. At sunset, you face toward the sun, which creates backlighting, glare, silhouettes, and a wider difference between the bright sky and dark canyon.
This means neither time guarantees evenly lit red cliffs. Clouds, haze, smoke, season, and your exact shooting position can change the result.
Sunrise usually gives you the calmer visit. Sunset usually gives you the more dramatic sky.
Sunrise: Lighting, Crowds, and Photo Tips
Sunrise is the better choice when you value cooler temperatures, fewer visitors, and a simpler exposure. The sun rises behind the overlook, so you are less likely to aim directly into intense sunlight.
Do not expect the whole canyon to glow at once. The rim and upper walls may brighten first, while the river and lower canyon remain in shade. The lighting often improves as the sun climbs, so staying for 30 to 60 minutes after sunrise can produce better detail than leaving immediately.
Note: Normal visitor access operates from sunrise to sunset. Plan to enter when the gate opens rather than assuming you can park and hike to the overlook before dawn. Confirm current seasonal hours before your visit.
Sunrise Photography Tips
- Expose for the bright rim: Protect highlights and lift darker canyon areas later if needed.
- Bracket exposures: Capture several brightness levels when the sky and canyon differ greatly.
- Use a wide lens: A full-frame focal length around 14–24 mm makes it easier to include the entire bend.
- Try a panorama: Phone users can hold the camera vertically and sweep slowly across the scene.
- Clean the lens: Dust and fingerprints become noticeable when shooting toward bright sky.
- Wait for stronger light: The view may gain texture and color as the sun rises higher.
Early-Morning Crowd Levels
Opening time is usually calmer than late afternoon and sunset, but sunrise is no longer a secret. Expect other photographers and tour groups, especially during spring, fall, holidays, and clear weekends.
Arriving at the entrance around opening time gives you the best chance of easier parking and more room at the overlook. Once you reach the rim, move away from the main viewing platform when conditions allow, but stay well back from unprotected edges.
Sunset: Lighting, Colors, and Photo Tips
Sunset is the stronger choice when you want a colorful sky, a sunstar, or a person silhouetted against the horizon. Because you face toward the setting sun, the scene can look more dramatic than it does at sunrise.
The trade-off is contrast. The sky may be very bright while the canyon becomes dark. A camera may need exposure bracketing, while a phone may automatically combine several frames using HDR. Results also depend on clouds. A clear sky can produce a strong sunstar but little color, while high clouds can catch pink, orange, or purple light.
Pro Tip: Arrive 60 to 90 minutes before sunset. The canyon may show more detail before the sun reaches the horizon, while the most colorful sky can appear shortly before or after the sun disappears.
Sunset Photography Tips
- Bracket three or more exposures: This helps preserve both the bright sky and dark canyon.
- Use a small aperture for a sunstar: Settings around f/11 to f/16 can create defined rays on many lenses.
- Shade the lens: Use a lens hood or your hand to reduce flare without placing your hand in the frame.
- Check the histogram: Avoid clipping large areas of the bright sky.
- Include a person carefully: Keep the subject far from the edge and use perspective rather than risk to create a dramatic silhouette.
- Carry a light: The trail becomes harder to see as you return to the parking lot.
Evening Crowds and Departure
Sunset is often the busiest period. Visitors may remain at the rim until the final color fades, which can create a concentrated walk back and a line of vehicles leaving the lot.
Pack your equipment before it becomes fully dark, keep your group together, and use a headlamp or flashlight on the return walk. Do not rush near the rim simply to leave ahead of other visitors.
What About Visiting at Midday?
Midday is not as comfortable or atmospheric, but it has one important advantage: the higher sun can reduce deep shadows and reveal more of the river and inner canyon. This can make midday useful for visitors who care more about seeing the full bend than capturing sunrise or sunset color.
The disadvantages are intense heat, harsh overhead light, glare, and heavier daytime traffic. In warm weather, avoid the hottest part of the day when possible. If you must visit then, carry more water than you expect to need and protect yourself from direct sun.
Crowds, Parking Fees, and Hours
The Horseshoe Bend parking lot is on City of Page land, although the overlook itself is within Glen Canyon National Recreation Area. The City charges a separate parking fee, and America the Beautiful and other National Park Service passes do not cover it.
As of , the official Page visitor FAQ says passenger-vehicle entry starts at $10 per vehicle. It also says cash and cards are accepted on weekdays, while holiday weekends may be cash only. Fees and payment rules can change, so verify them on the official Visit Page Arizona FAQ before traveling.
On holidays and especially busy weekends, the City may require visitors to use a shuttle after the main lot fills. Use the designated parking system and follow staff directions. Do not plan to park along US Highway 89 or on surrounding land.
Early-Morning Parking
Parking is usually easiest near opening time. Because the entrance normally opens around sunrise, there is little value in arriving far earlier and waiting on the roadside. Check the current opening time, arrive shortly before it, and be ready to enter when staff begin admitting vehicles.
Midday Parking
Midday can bring a steady flow of visitors, especially during tour season. Allow extra time to enter, pay, park, use the restroom, and walk to the overlook. If a shuttle system is operating, follow current signs and staff instructions.
Sunset Parking
For sunset, arrive 60 to 90 minutes early. This gives you time to park, walk the trail, choose a safe viewing position, and photograph the softer light before the sun reaches the horizon.
Trail Distance, Accessibility, and Amenities
According to the National Park Service Horseshoe Bend guide, the hardened trail is approximately 1.5 miles or 2.4 kilometres round trip. The trail meets Architectural Barriers Act accessibility standards.
The route includes slopes and full sun, so weather can make the walk feel harder than its distance suggests. Many visitors need about 15 to 25 minutes in each direction. Allow at least 60 to 90 minutes for the full visit, and more if you are waiting for changing light.
- Restrooms: Available at the parking area, not along the trail.
- Drinking water: Not available along the trail. Carry your own supply.
- Shade: Two shade structures are located along the trail, but there is no shade at the overlook.
- Railing: The main viewing platform has a railing. Much of the surrounding rim remains unprotected.
- Wheelchairs and strollers: The hardened trail is designed for accessibility, but heat, wind, and slopes may still affect comfort.
Weather, Seasonality, and Best Months to Visit
Horseshoe Bend has a high-desert climate with strong sun, low humidity, rapid temperature changes, and limited natural shade. Always check the current Glen Canyon weather guidance and local forecast rather than relying only on seasonal averages.
Spring
Spring often brings comfortable daytime temperatures and cool mornings, but it can also be windy. Sunrise may require a jacket, while afternoon conditions can feel much warmer in direct sun.
Summer
Summer can be extremely hot. Early morning is generally the safest and most comfortable period. July and August also fall within the regional monsoon season, when thunderstorms may form quickly and produce lightning, strong wind, dust, and brief heavy rain.
Fall
Fall often provides mild daytime weather and cooler evenings. It is one of the most comfortable periods for combining the walk with sunrise or sunset photography, although popular weekends can still be busy.
Winter
Winter usually brings lighter crowds, but mornings can be cold and windy. Snow or ice is possible during cold weather, so check conditions before driving or walking the trail.
For many visitors, March through May and September through November offer a useful balance of comfortable weather and manageable heat. These months are not guaranteed to be quiet, particularly during school breaks and holiday weekends.
Safety Considerations for Early Mornings and Evenings
Warning: Only the main viewing platform has protective railing. Much of the rim is exposed beside an approximately 1,000-foot drop. Stay well back from unprotected edges, supervise children and pets closely, and never step backward while looking through a camera or phone.
Low light adds another risk because uneven ground and cliff edges become harder to judge. Carry a working flashlight or headlamp for any return walk near sunset.
Follow these safety practices:
- Carry water: There is no drinking water along the trail.
- Wear secure footwear: Choose shoes with good traction rather than sandals with smooth soles.
- Protect yourself from heat: Wear a hat, use sunscreen, rest in shade, and turn back if you feel dizzy, weak, confused, or nauseated.
- Leave during thunderstorms: The exposed overlook is unsafe during lightning. If you hear thunder or see a storm approaching, return to your vehicle.
- Watch the wind: Sudden gusts can affect balance, tripods, hats, and loose equipment.
- Secure equipment: Use a camera strap and keep bags away from walking paths and edges.
- Keep children close: Do not allow running or climbing near the rim.
How to Plan Your Visit and What to Bring
A simple plan will make either sunrise or sunset easier:
- Check the current sunrise or sunset time for Page, Arizona.
- Confirm official parking hours, fees, alerts, and weather.
- Allow at least 60 to 90 minutes for parking, walking, viewing, and returning.
- Carry water for every person and pet.
- Use the parking-lot restroom before starting the trail.
- Keep a headlamp or flashlight in your bag for low-light conditions.
- Download directions or save a screenshot in case cellular reception is weak.
What to Bring
- Water and a small snack
- Sun hat and sunscreen
- Weather-appropriate layers
- Sturdy walking shoes
- Headlamp or flashlight
- Portable phone charger
- Wide-angle camera or phone
- Lens cloth and spare camera battery
- Tripod only if you can place it without blocking paths
- Waste bags and paw protection when visiting with a dog
Accessibility, Families, and Pets
The official trail is hardened and accessibility compliant, and the main viewing platform includes protective railing. However, there is no shade at the overlook, and heat or strong wind can make the route difficult for some visitors.
Families should keep young children within arm’s reach near the rim. A photo is never worth allowing a child to stand, jump, or climb near an unprotected drop.
Pets are permitted on the trail when kept on a leash no longer than six feet. Bring water, collect all waste, and protect paws from hot pavement and sand. Never leave a pet unattended in a vehicle.
Choosing Which Time Works Best for Your Goals
Use your main goal to make the final choice:
- Choose sunrise when you want cooler temperatures, fewer visitors, less direct glare, and a calmer walk.
- Choose sunset when you want a colorful sky, silhouettes, backlighting, or a possible sunstar.
- Choose late morning or midday when seeing detail deep inside the canyon and river matters more than comfort or soft light.
- Choose a weekday when reducing crowds is more important than fitting the visit into a weekend itinerary.
- Choose a cloudy or hazy day carefully: Clouds may improve sunset color, but heavy haze or smoke can hide distant detail.
For a first visit, sunrise is the easier overall experience. For a dedicated landscape photograph, sunset offers more drama but requires better exposure control and more patience with crowds.
Frequently Asked Questions
Is sunrise or sunset better at Horseshoe Bend?
Sunrise is better for cooler weather, lighter crowds, and easier exposure. Sunset is better for a colorful sky, silhouettes, and backlighting. The canyon may remain partly shadowed at sunrise and become very dark near sunset.
Can you enter Horseshoe Bend before sunrise?
Normal visitor access begins around sunrise and ends around sunset. Do not assume the parking area will admit visitors before dawn. Check the current City of Page schedule before your visit. Special night or pre-dawn access may require separate authorization.
How much does parking at Horseshoe Bend cost?
As of July 23, 2026, official visitor information says passenger-vehicle entry starts at $10. The City of Page manages the lot, and National Park Service passes do not cover the parking charge. Check the current fee and payment rules before traveling.
Are drones allowed at Horseshoe Bend?
The National Park Service prohibits launching, landing, or operating an uncrewed aircraft from NPS-administered land or water in Glen Canyon without written approval. Because the site includes mixed jurisdictions and nearby aviation considerations, check posted rules and the FAA B4UFLY service before bringing a drone.
Is there cell service at the overlook?
Reception varies by carrier, device, and network conditions. Download directions, save important information offline, charge your phone, and agree on a meeting point rather than depending on continuous service.
Can you walk down to or swim in the Colorado River from the overlook?
No safe visitor trail connects the overlook to the river. Never attempt to descend the cliffs. Visitors seeking a water-based experience should use a designated river-access area or book an authorized guided trip elsewhere in Glen Canyon.
Are pets permitted on the trail and overlook?
Yes. Pets are permitted when leashed, with a maximum leash length of six feet. Bring water, collect waste, protect paws from hot surfaces, and keep pets away from unprotected cliff edges.
Is food or drinking water available at Horseshoe Bend?
Do not depend on buying food or water at the overlook. There is no drinking water along the trail, so bring enough for your group. Restrooms are available in the parking area.
Sources
- National Park Service: Horseshoe Bend — trail distance, accessibility, shade, restrooms, parking administration, pets, drop-off hazards, and drone restrictions.
- Visit Page Arizona: Frequently Asked Questions — visitor hours, current parking fee, payment methods, pass exclusions, and busy-day shuttle information.
- National Park Service: Glen Canyon Weather — seasonal weather, heat, wind, and monsoon conditions.
- National Park Service: Glen Canyon Safety — heat illness, lightning, water, and outdoor safety guidance.
- Federal Aviation Administration: B4UFLY — current drone airspace and flight-restriction checks.
- National Park Service: Swimming in Glen Canyon — water-access and swimming-safety context for Lake Powell and the Colorado River.
Conclusion
Choose sunrise when you want the quieter, cooler, and easier visit. Choose sunset when you want the most dramatic sky and are comfortable handling crowds, glare, and a darker walk back.
Whichever time you choose, arrive during official operating hours, allow enough time for the 1.5-mile round-trip walk, carry water, and stay well back from unprotected edges. Good weather and safe positioning will improve your experience more than standing dangerously close to the rim for a photograph.